Quick Start
Update to the latest version
- Check the current version
- Run an update script
Prepare a template app
Create a new EAP by copying from a template EAP
- runtoolkit and sdk_home
- Launch the EDGEMATRIX Stream Toolkit application
- Create a new EAP
- Select the EAP
Validate the new EAP
- Open a validation dialog
- Run a validation
- Use your own sample siginal to validate
Test the new EAP
- Execute, Choose a stream and Create an EAP package
- Play a pipeline
- Stop a pipeline
- Movie files made by record actions
Update to the latest version
Before starting, please update to the latest version.
Check the current version
Run the following command to check the currently installed version.
$ apt show python3-edgematrix-stream-toolkit
  Package: python3-edgematrix-stream-toolkit
  Version: 2.1.0b0-1
  Priority: optional
  Section: python
  Source: edgematrix-stream-toolkit
  Maintainer: Takenori Sato <tsato@edgematrix.com>
  Installed-Size: 311 kB
  Depends: python3-boto3, python3-gpg, python3-pycryptodome, python3-pysnmp4, python3-requests, python3:any (>= 3.3.2-2~), edgematrix-stream (>= 2.5.2), edgematrix-stream (<< 3.0), python3-emisecurity (>= 2.0.3), python3-emitools (>= 1.0.9), meson, python3-libnvinfer-dev, uff-converter-tf
  Homepage: https://github.com/edge-ai/EdgeStreamSDK
  Download-Size: 41.3 kB
  APT-Manual-Installed: yes
  APT-Sources: https://apt.console.edgematrix.com/airbase/apt/debian r32.4/main arm64 Packages
  Description: EDGEMATRIX Stream Toolkit allows an AI model developer to build, test, and package an EAP (EDGEMATRIX Stream Application Package).
In the example above, the version is 2.1.0b0-1.
Run an update script
Run the following command to try updating to the latest version.
/mnt/nvme/toolkit_home$ cd bin/
/mnt/nvme/toolkit_home/bin$ ./update_toolkit.sh
upgrading to
[sudo] password for nvidia:

a local proxy is launching...
a local proxy is launching...
Hit:1 http://ppa.launchpad.net/aleksander-m/modemmanager-bionic/ubuntu bionic InRelease
Hit:2 http://ports.ubuntu.com/ubuntu-ports bionic InRelease
Hit:3 https://repo.download.nvidia.com/jetson/common r32.4 InRelease
Hit:4 http://ports.ubuntu.com/ubuntu-ports bionic-updates InRelease
Get:5 https://apt.console.edgematrix.com/airbase/apt/debian r32.4 InRelease [2,408 B]
Hit:6 http://ports.ubuntu.com/ubuntu-ports bionic-backports InRelease
Hit:7 http://ports.ubuntu.com/ubuntu-ports bionic-security InRelease
Hit:8 https://packagecloud.io/github/git-lfs/ubuntu bionic InRelease
Fetched 2,408 B in 2s (1,019 B/s)
Reading package lists... Done
Building dependency tree
Reading state information... Done
347 packages can be upgraded. Run 'apt list --upgradable' to see them.
Reading package lists... Done
Building dependency tree
Reading state information... Done
python3-edgematrix-stream-toolkit is already the newest version (2.1.0b0-1).
0 upgraded, 0 newly installed, 0 to remove and 347 not upgraded.
Reading package lists... Done
Building dependency tree
Reading state information... Done
0 upgraded, 0 newly installed, 0 to remove and 347 not upgraded.
Note that Get:5 https://apt.console.edgematrix.com/airbase/apt/debian r32.4 InRelease is the private APT repository by EDGEMATRIX that can be accessed only an authorized device.
In the example above, the sdk was confirmed as the latest version.
Prepare a template app
Each template has prepare_resource.sh that copies and compiles libraries, and generates an engine file to setup everything needed to run a particular app on your toolkit box.
An engine file varies by a version of CUDA, TensorRT, and GPU architecture. So please make sure to run the prepare_resource.sh script whenever necessary.
For example, this is how to prepare EMI Pedestrian DCF Counter on a Xavier NX Toolkit Box.
/mnt/nvme/toolkit_home/bin$ cd ..
/mnt/nvme/toolkit_home$ cd templates/
/mnt/nvme/toolkit_home/templates$ cd EMI\ Pedestrian\ DCF\ Counter/resource/
/mnt/nvme/toolkit_home/templates/EMI Pedestrian DCF Counter/resource$ $ ./prepare_resource.sh
copying the tracker library...
generating engine files...
Setting pipeline to PAUSED ...

Using winsys: x11
gstnvtracker: Loading low-level lib at libnvds_nvdcf.so
gstnvtracker: Batch processing is ON
gstnvtracker: Past frame output is OFF
[NvDCF] Initialized
ERROR: Deserialize engine failed because file path: /mnt/nvme/projects/ReferenceApps/templates/EMI Pedestrian DCF Counter/resource/models/Primary_Detector/resnet10.caffemodel_b1_gpu0_int8.engine open error
0:00:03.970596328  9519   0x558b5ce700 WARN                 nvinfer gstnvinfer.cpp:616:gst_nvinfer_logger:<nvinfer0> NvDsInferContext[UID 1]: Warning from NvDsInferContextImpl::deserializeEngineAndBackend() <nvdsinfer_context_impl.cpp:1690> [UID = 1]: deserialize engine from file :/mnt/nvme/projects/ReferenceApps/templates/EMI Pedestrian DCF Counter/resource/models/Primary_Detector/resnet10.caffemodel_b1_gpu0_int8.engine failed
0:00:03.970755017  9519   0x558b5ce700 WARN                 nvinfer gstnvinfer.cpp:616:gst_nvinfer_logger:<nvinfer0> NvDsInferContext[UID 1]: Warning from NvDsInferContextImpl::generateBackendContext() <nvdsinfer_context_impl.cpp:1797> [UID = 1]: deserialize backend context from engine from file :/mnt/nvme/projects/ReferenceApps/templates/EMI Pedestrian DCF Counter/resource/models/Primary_Detector/resnet10.caffemodel_b1_gpu0_int8.engine failed, try rebuild
0:00:03.970866666  9519   0x558b5ce700 INFO                 nvinfer gstnvinfer.cpp:619:gst_nvinfer_logger:<nvinfer0> NvDsInferContext[UID 1]: Info from NvDsInferContextImpl::buildModel() <nvdsinfer_context_impl.cpp:1715> [UID = 1]: Trying to create engine from model files
INFO: [TRT]: Reading Calibration Cache for calibrator: EntropyCalibration2
INFO: [TRT]: Generated calibration scales using calibration cache. Make sure that calibration cache has latest scales.
INFO: [TRT]: To regenerate calibration cache, please delete the existing one. TensorRT will generate a new calibration cache.
INFO: [TRT]:
INFO: [TRT]: --------------- Layers running on DLA:
INFO: [TRT]:
INFO: [TRT]: --------------- Layers running on GPU:
INFO: [TRT]: conv1 + activation_1/Relu, block_1a_conv_1 + activation_2/Relu, block_1a_conv_2, block_1a_conv_shortcut + add_1 + activation_3/Relu, block_2a_conv_1 + activation_4/Relu, block_2a_conv_2, block_2a_conv_shortcut + add_2 + activation_5/Relu, block_3a_conv_1 + activation_6/Relu, block_3a_conv_2, block_3a_conv_shortcut + add_3 + activation_7/Relu, block_4a_conv_1 + activation_8/Relu, block_4a_conv_2, block_4a_conv_shortcut + add_4 + activation_9/Relu, conv2d_cov, conv2d_cov/Sigmoid, conv2d_bbox,
INFO: [TRT]: Detected 1 inputs and 2 output network tensors.
0:00:19.485292237  9519   0x558b5ce700 INFO                 nvinfer gstnvinfer.cpp:619:gst_nvinfer_logger:<nvinfer0> NvDsInferContext[UID 1]: Info from NvDsInferContextImpl::buildModel() <nvdsinfer_context_impl.cpp:1748> [UID = 1]: serialize cuda engine to file: /mnt/nvme/projects/ReferenceApps/templates/EMI Pedestrian DCF Counter/resource/models/Primary_Detector/resnet10.caffemodel_b1_gpu0_int8.engine successfully
INFO: [Implicit Engine Info]: layers num: 3
0   INPUT  kFLOAT input_1         3x368x640
1   OUTPUT kFLOAT conv2d_bbox     16x23x40
2   OUTPUT kFLOAT conv2d_cov/Sigmoid 4x23x40

0:00:19.495537422  9519   0x558b5ce700 INFO                 nvinfer gstnvinfer_impl.cpp:313:notifyLoadModelStatus:<nvinfer0> [UID 1]: Load new model:dstest1_pgie_config_debug.txt sucessfully
Pipeline is PREROLLING ...
Got context from element 'eglglessink0': gst.egl.EGLDisplay=context, display=(GstEGLDisplay)NULL;
Opening in BLOCKING MODE
NvMMLiteOpen : Block : BlockType = 261
NVMEDIA: Reading vendor.tegra.display-size : status: 6
NvMMLiteBlockCreate : Block : BlockType = 261
Pipeline is PREROLLED ...
Setting pipeline to PLAYING ...
New clock: GstSystemClock
Got EOS from element "pipeline0".
Execution ended after 0:00:00.001001990
Setting pipeline to PAUSED ...
Setting pipeline to READY ...
[NvDCF] De-initialized
Setting pipeline to NULL ...
Freeing pipeline ...
Create a new EAP by copying from a template EAP
At first, let’s explore a command line program and the main directory you work on. Then, launch the EDGEMATRIX Stream Toolkit application, and create a new EAP application from one of templates.
runtoolkit and toolkit_home
The command line program to launch the toolkit application is runtoolkit.
And the main directory you work on is toolkit_home, which is mounted on a secondary drive.
/mnt/nvme/toolkit_home$ runtoolkit --help
usage: EDGEMATRIX Stream Toolkit [-h] [--verbose] [--timeout TIMEOUT]
                                 [-d DEVICEID] [-s SECRETKEY]
                                 toolkit_home

positional arguments:
  toolkit_home          A folder path of the toolkit_home

optional arguments:
  -h, --help            show this help message and exit
  --verbose, -v         if set, the logging level is set as DEBUG
  --timeout TIMEOUT, -t TIMEOUT
                        A timeout in seconds for a pipeline to start
  -d DEVICEID, --deviceid DEVICEID
                        use this deviceid if set
  -s SECRETKEY, --secretkey SECRETKEY
                        use this secret key if set
Launch the EDGEMATRIX Stream Toolkit application
Launch the EDGEMATRIX Stream Toolkit application by executing runtoolkit.
nvidia@nvidia-desktop:/mnt/nvme/toolkit_home$ runtoolkit ./
Then, the following window will be shown.

By clicking About button, you can check the version.
Now this time, let’s create a new applicatoin that counts a vehicle by car color.
Create a new EAP
Press New, then you will see a dialog below.
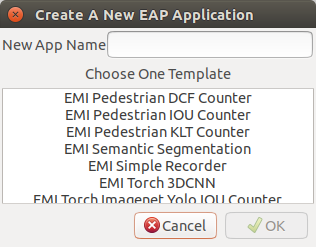
Then, enter “My First Vehicle Counter”, select EMI Vehicle DCF Counter By Color, then click OK. If this template is used for the first time, don’t forget to prepare this template as explained above.

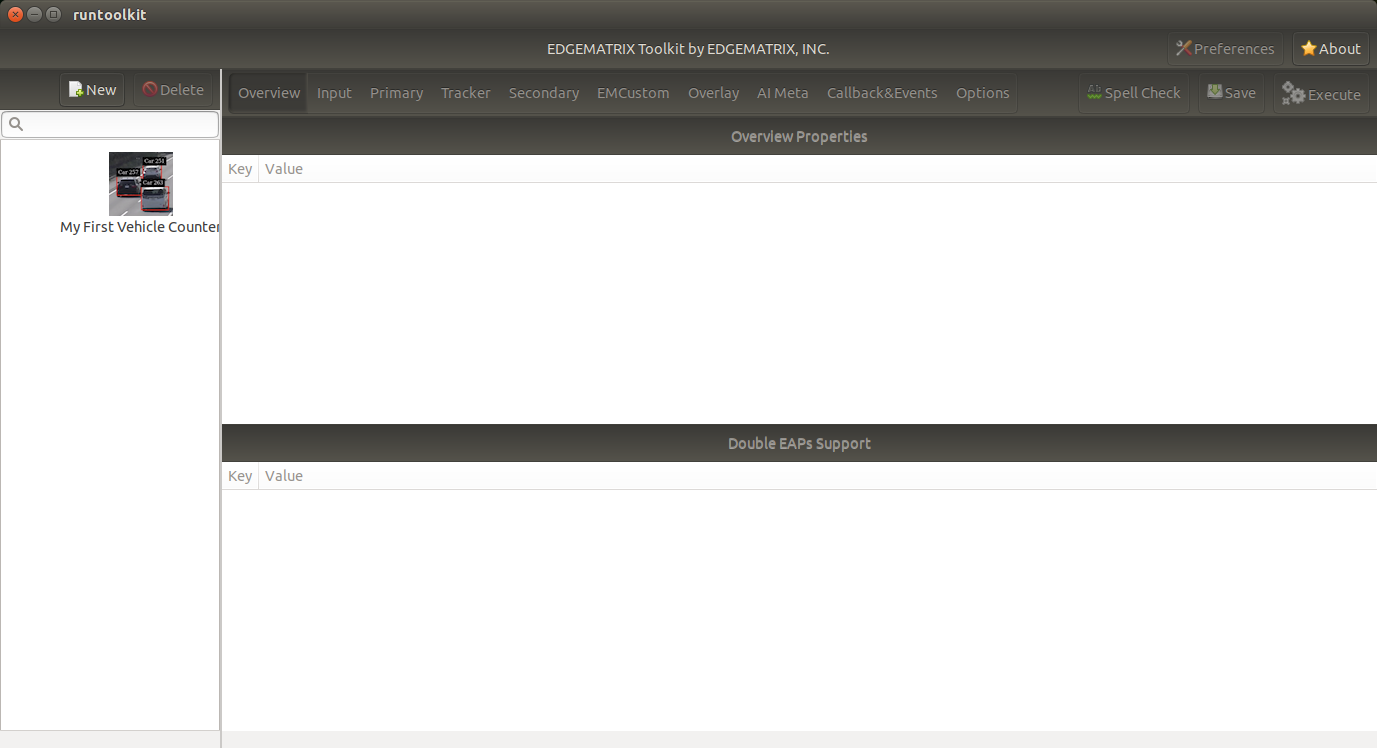
This will copy the template to create your application. Now the Toolkit window shows your application as follows.
As below, your application folder contains exactly the same structure as the copied template folder.
/mnt/nvme/toolkit_home$ diff applications/My\ First\ Vehicle\ Counter/ templates/EMI\ Vehicle\ DCF\ Counter\ By\ Color/
Common subdirectories: applications/My First Vehicle Counter/resource and templates/EMI Vehicle DCF Counter By Color/resource
Select a new EAP
Now let’s select the newly created EAP application in the sidebar.
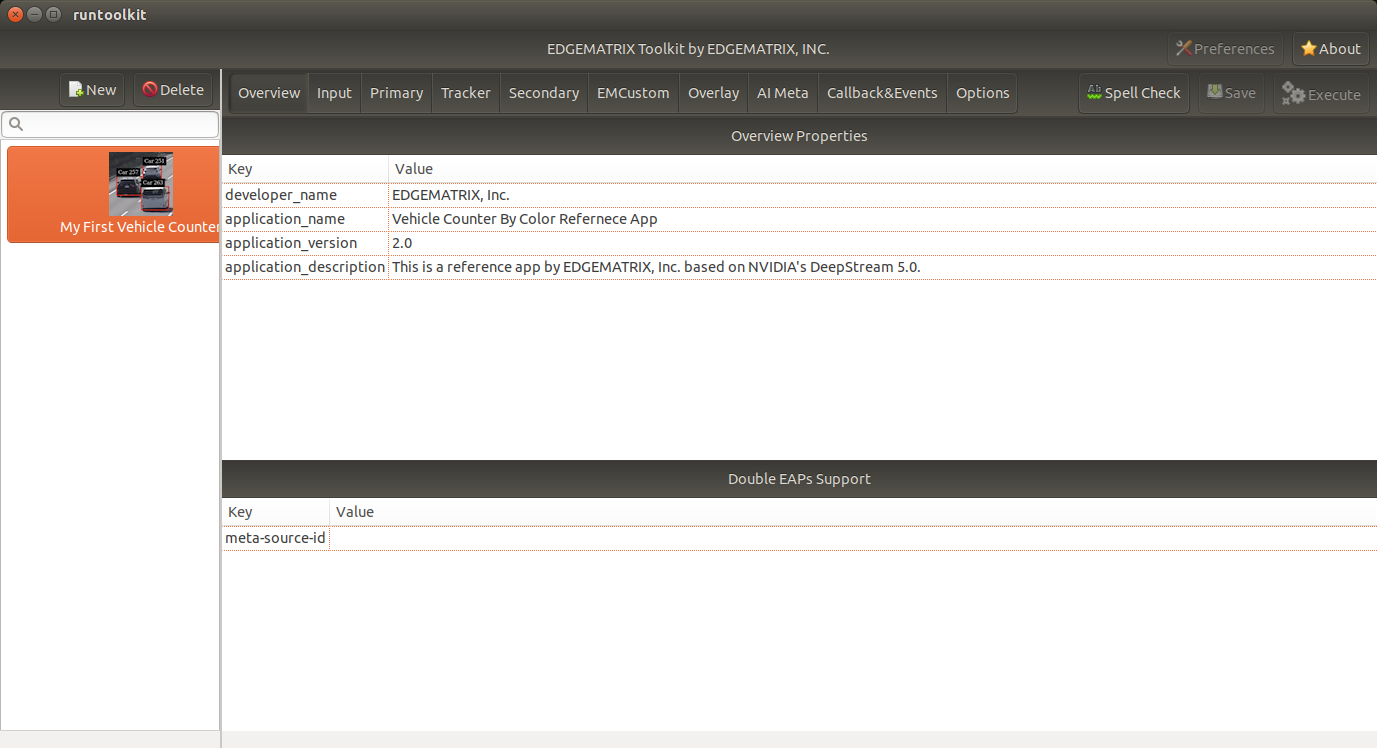
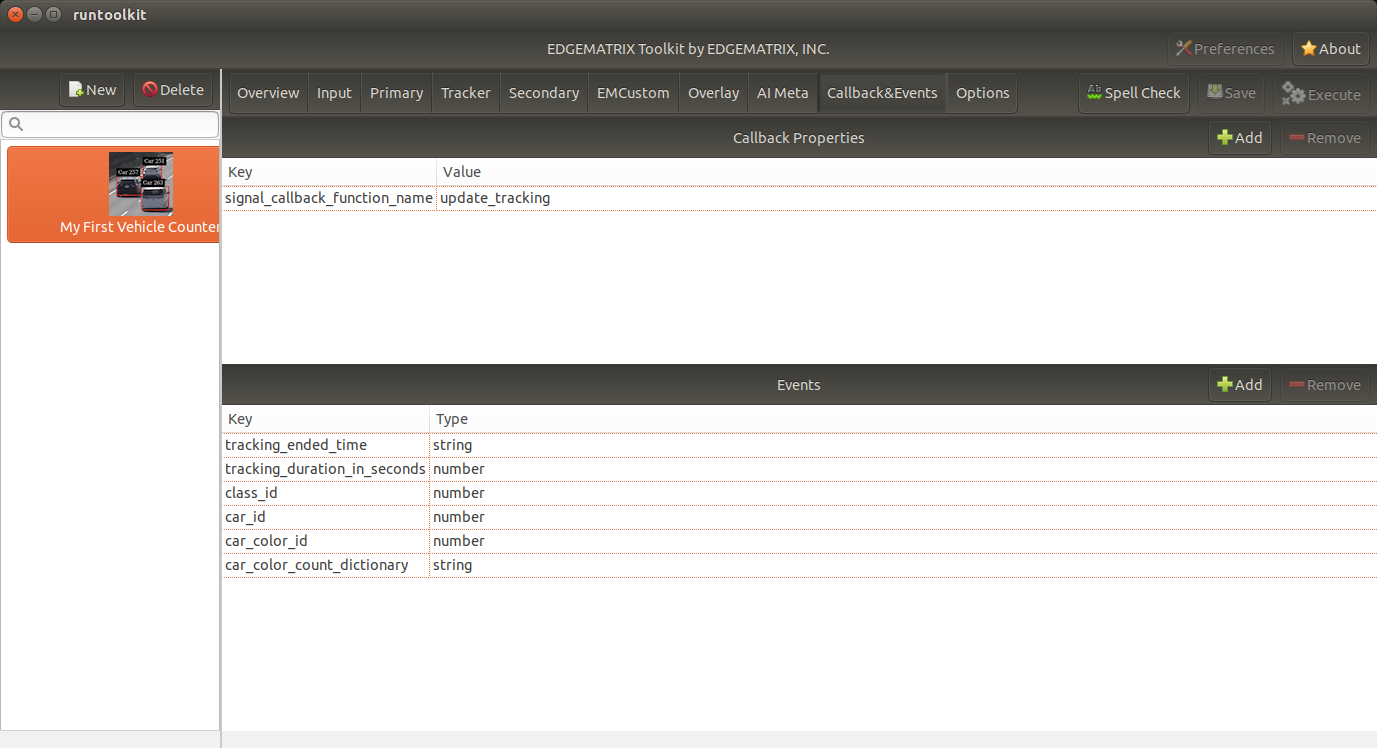
Then, it will show you all the configurations.
By clicking each of configuration groups, you can see its detail.
For example, you can see the followings when you click Callback&Events.
Let’s check what’s inside the new application folder.
/mnt/nvme/toolkit_home$ ls -l applications/My\ First\ Vehicle\ Counter/
total 32
-rw-rw-r-- 1 nvidia nvidia  6764 Sep 17 17:48 emi_signal_callback.py
-rw-rw-r-- 1 nvidia nvidia  2600 Sep 17 17:48 emi_stream_config.json
-rw-rw-r-- 1 nvidia nvidia 13271 Sep 17 17:48 icon.png
drwxrwxr-x 3 nvidia nvidia  4096 Sep 27 14:10 resource
/mnt/nvme/toolkit_home$ ls -lR applications/My\ First\ Vehicle\ Counter/
'applications/My First Vehicle Counter/':
total 32
-rw-rw-r-- 1 nvidia nvidia  6764 Sep 17 17:48 emi_signal_callback.py
-rw-rw-r-- 1 nvidia nvidia  2600 Sep 17 17:48 emi_stream_config.json
-rw-rw-r-- 1 nvidia nvidia 13271 Sep 17 17:48 icon.png
drwxrwxr-x 3 nvidia nvidia  4096 Sep 27 14:10 resource

'applications/My First Vehicle Counter/resource':
total 3132
-rw-rw-r-- 1 nvidia nvidia    3502 Sep 17 17:48 dstest1_pgie_config_debug.txt
-rw-rw-r-- 1 nvidia nvidia    3522 Sep 17 17:48 dstest1_pgie_config.txt
-rw-rw-r-- 1 nvidia nvidia    3654 Sep 17 17:48 dstest2_sgie1_config_debug.txt
-rw-rw-r-- 1 nvidia nvidia    3674 Sep 17 17:48 dstest2_sgie1_config.txt
-rw-r--r-- 1 nvidia nvidia 3176392 Sep 27 14:10 libnvds_nvdcf.so
drwxr-xr-x 4 nvidia nvidia    4096 Sep 27 14:10 models
-rwxrwxr-x 1 nvidia nvidia     481 Sep 17 17:48 prepare_resource.sh
-rw-rw-r-- 1 nvidia nvidia    1684 Sep 17 17:48 tracker_config.yml

'applications/My First Vehicle Counter/resource/models':
total 8
drwxr-xr-x 2 nvidia nvidia 4096 Sep 27 14:11 Primary_Detector
drwxr-xr-x 2 nvidia nvidia 4096 Sep 27 14:10 Secondary_CarColor

'applications/My First Vehicle Counter/resource/models/Primary_Detector':
total 10400
-rw-r--r-- 1 nvidia nvidia    1126 Sep 27 14:10 cal_trt.bin
-rw-r--r-- 1 nvidia nvidia      28 Sep 27 14:10 labels.txt
-rw-r--r-- 1 nvidia nvidia 6244865 Sep 27 14:10 resnet10.caffemodel
-rw-r--r-- 1 nvidia nvidia 4383302 Sep 27 14:11 resnet10.caffemodel_b1_gpu0_int8.engine
-rw-r--r-- 1 nvidia nvidia    7605 Sep 27 14:10 resnet10.prototxt

'applications/My First Vehicle Counter/resource/models/Secondary_CarColor':
total 14820
-rw-r--r-- 1 nvidia nvidia    2078 Sep 27 14:10 cal_trt.bin
-rw-r--r-- 1 nvidia nvidia      71 Sep 27 14:10 labels.txt
-rw-r--r-- 1 nvidia nvidia  150543 Sep 27 14:10 mean.ppm
-rw-r--r-- 1 nvidia nvidia 9017648 Sep 27 14:10 resnet18.caffemodel
-rw-r--r-- 1 nvidia nvidia 5979282 Sep 27 14:10 resnet18.caffemodel_b16_gpu0_int8.engine
-rw-r--r-- 1 nvidia nvidia   14058 Sep 27 14:10 resnet18.prototxt
Please note for now that this application uses trained model binaries as they are. You will see later how they are protected as an EAP package.
Validate the new EAP
In a real project, you will customize this app as needed. Then, once ready, the first thing to try is to validate if it is valid.
Open a validation dialog
Press Spell Check button, which may sound odd, but anyway, then, you will see a dialog as below.
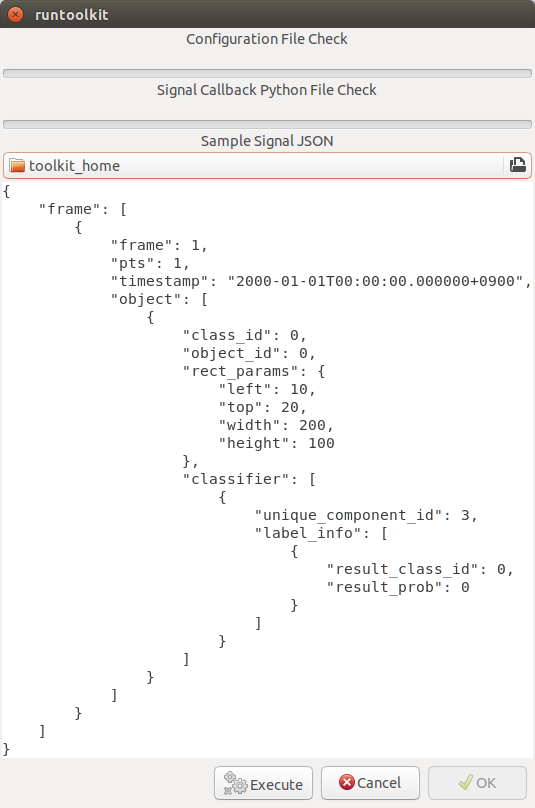
This shows two check results not shown yet and the sample signal json to test the callback function.
Run a validation
Press Execute, and see the results.
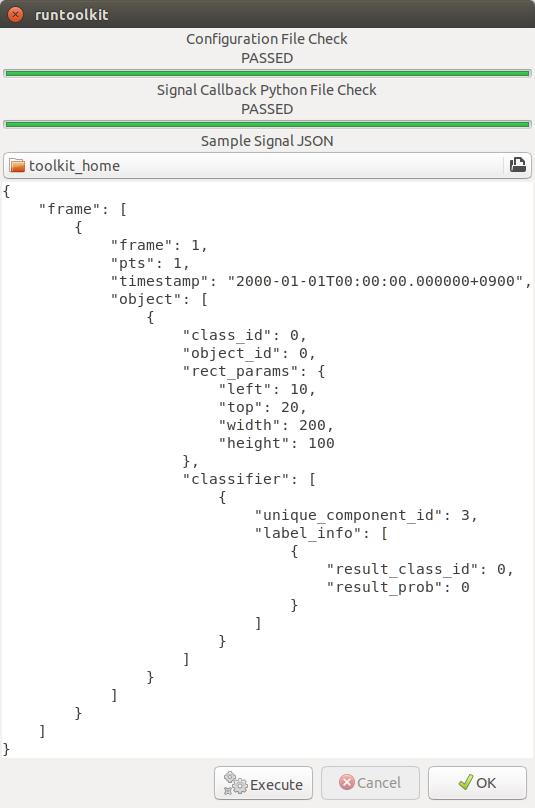
Nothing is customized yet, so it should pass as above.
Use your own sample siginal to validate
But, if you have customized your callback, then, you are likely to test a different sample json. In such a case, you can write your own sample, then use it for this validation.
Click the file chooser, select your file, then, you are ready to validate with your own sample as below.
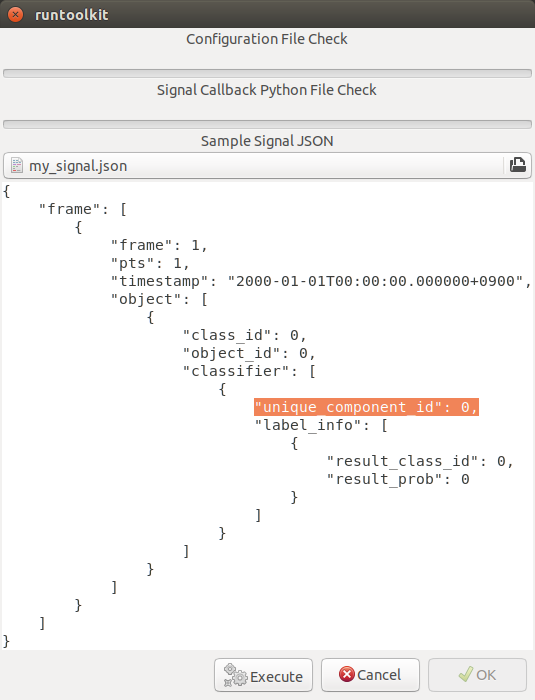
In this case, the value of unique_component_id was changed.
Test the new EAP
If you pass the validation, Execute button becomes active for you to run your application.
Execute, Choose a stream and Create an EAP package
By clicking the Execute button, it will show you an execution dialog.
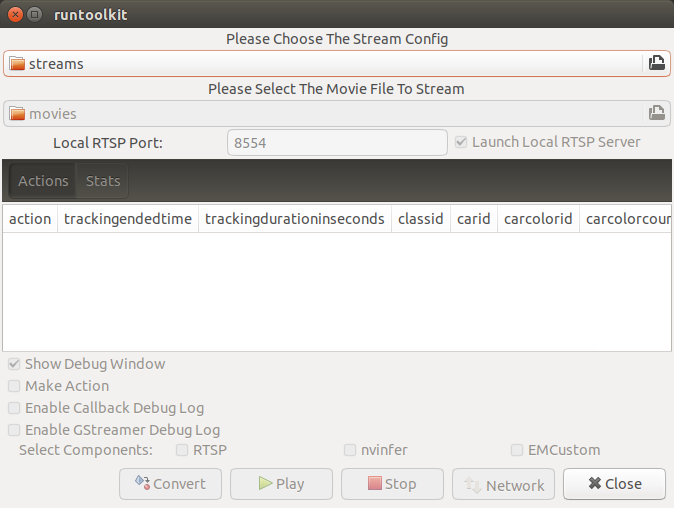
At first, you need to choose a stream where your application will run.
By default, streams folder of the toolkit home directory is chosen.
Click the file chooser, open the vehicle_stream folder, then select vehicle_counter_stream_configuration.json.
The streams folder and the movies folder look as below.
/mnt/nvme/toolkit_home$ ls -l streams/
total 80
drwxrwxr-x 2 nvidia nvidia 4096 Sep 24 20:53 doubleeap_emcustom
drwxrwxr-x 2 nvidia nvidia 4096 Sep 24 20:53 face_net
drwxrwxr-x 2 nvidia nvidia 4096 Sep 17 17:48 line_stream
drwxrwxr-x 2 nvidia nvidia 4096 Sep 17 17:48 no_app_stream
drwxrwxr-x 2 nvidia nvidia 4096 Sep 17 17:48 parking_violation_detector_stream
drwxrwxr-x 2 nvidia nvidia 4096 Sep 24 20:53 pedestrian_stream
drwxrwxr-x 2 nvidia nvidia 4096 Sep 17 17:48 pedestrian_stream_bottomleft
drwxrwxr-x 2 nvidia nvidia 4096 Sep 17 17:48 pedestrian_stream_upperleft
drwxrwxr-x 2 nvidia nvidia 4096 Sep 17 17:48 pedestrian_stream_upperright
drwxrwxr-x 4 nvidia nvidia 4096 Sep 27 13:39 segmentation_stream
drwxrwxr-x 2 nvidia nvidia 4096 Sep 24 20:53 sensor_stream
drwxrwxr-x 2 nvidia nvidia 4096 Sep 24 20:53 simple_recorder_stream
drwxrwxr-x 2 nvidia nvidia 4096 Sep 17 17:48 snmp_stream
drwxrwxr-x 2 nvidia nvidia 4096 Sep 24 20:53 torch_3dcnn_stream
drwxrwxr-x 2 nvidia nvidia 4096 Sep 24 20:53 torch_imagenet_stream
drwxrwxr-x 2 nvidia nvidia 4096 Sep 24 20:53 vehicle_colorwatcher_stream
drwxrwxr-x 2 nvidia nvidia 4096 Sep 24 20:53 vehicle_prepost_stream
drwxrwxr-x 2 nvidia nvidia 4096 Sep 24 20:53 vehicle_stream
drwxrwxr-x 2 nvidia nvidia 4096 Sep 24 20:53 yolo_stream
drwxrwxr-x 2 nvidia nvidia 4096 Sep 17 17:48 yolo_stream_bottomright
/mnt/nvme/toolkit_home$ ls -l movies/
total 1059072
-rw-rw-r-- 1 nvidia nvidia 295534884 Sep 17 17:59 2020-01-24_manif-Belfort-1m-faststart.mp4
-rw-rw-r-- 1 nvidia nvidia 129145064 Sep 17 17:59 Black_swans_in_Kamianets-Podilskyi-4m-faststart.mp4
-rw-rw-r-- 1 nvidia nvidia 129384358 Sep 17 17:59 ChuoHwy-720p-faststart.mp4
-rw-rw-r-- 1 nvidia nvidia 251927313 Sep 17 17:59 Park-FHD@30p-4MBs-faststart.mp4
-rw-rw-r-- 1 nvidia nvidia 278477073 Sep 17 17:59 Street-FHD@30p-4MBs-faststart.mp4
Next, choose a movie file to use as a local RTSP streaming as below.
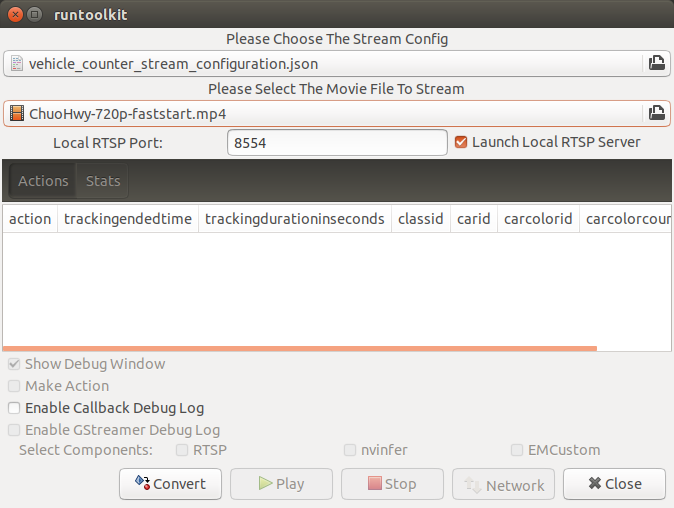
Now, Convert button becomes active for you to make an EAP package in the chosen stream folder.
Press the Convert button, then a popup window to enter a passphrase is shown.

It is the passphrase to protect your model binary. An EAP will be encrypted by the private key of each target device, and placed safely on an encrypted secondary drive of the target device, which is futher protected by a secureboot from its root and whose root user is not exposed. But, the last protection of your precious model binary is this passphrase. So, please choose carefully when you make your submission package.
Enter your passphrase, press OK, then the packaging task will run for a while as a spinner is shown.
The dialog window will looks as below once completes.
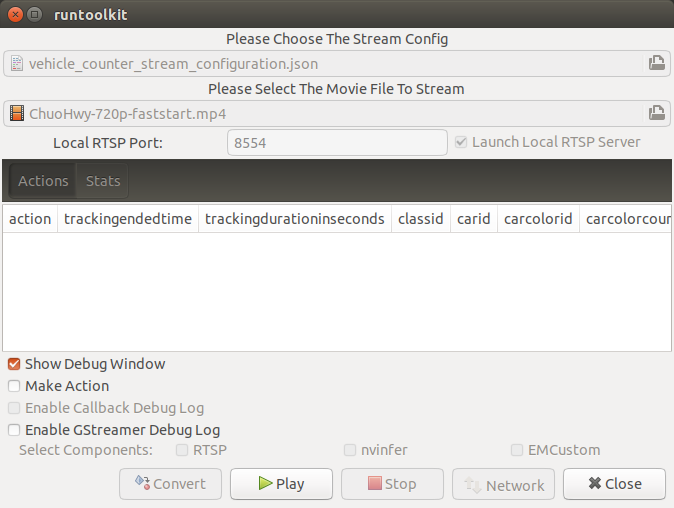
Play a pipeline
Now you are ready to run your application in the stream.
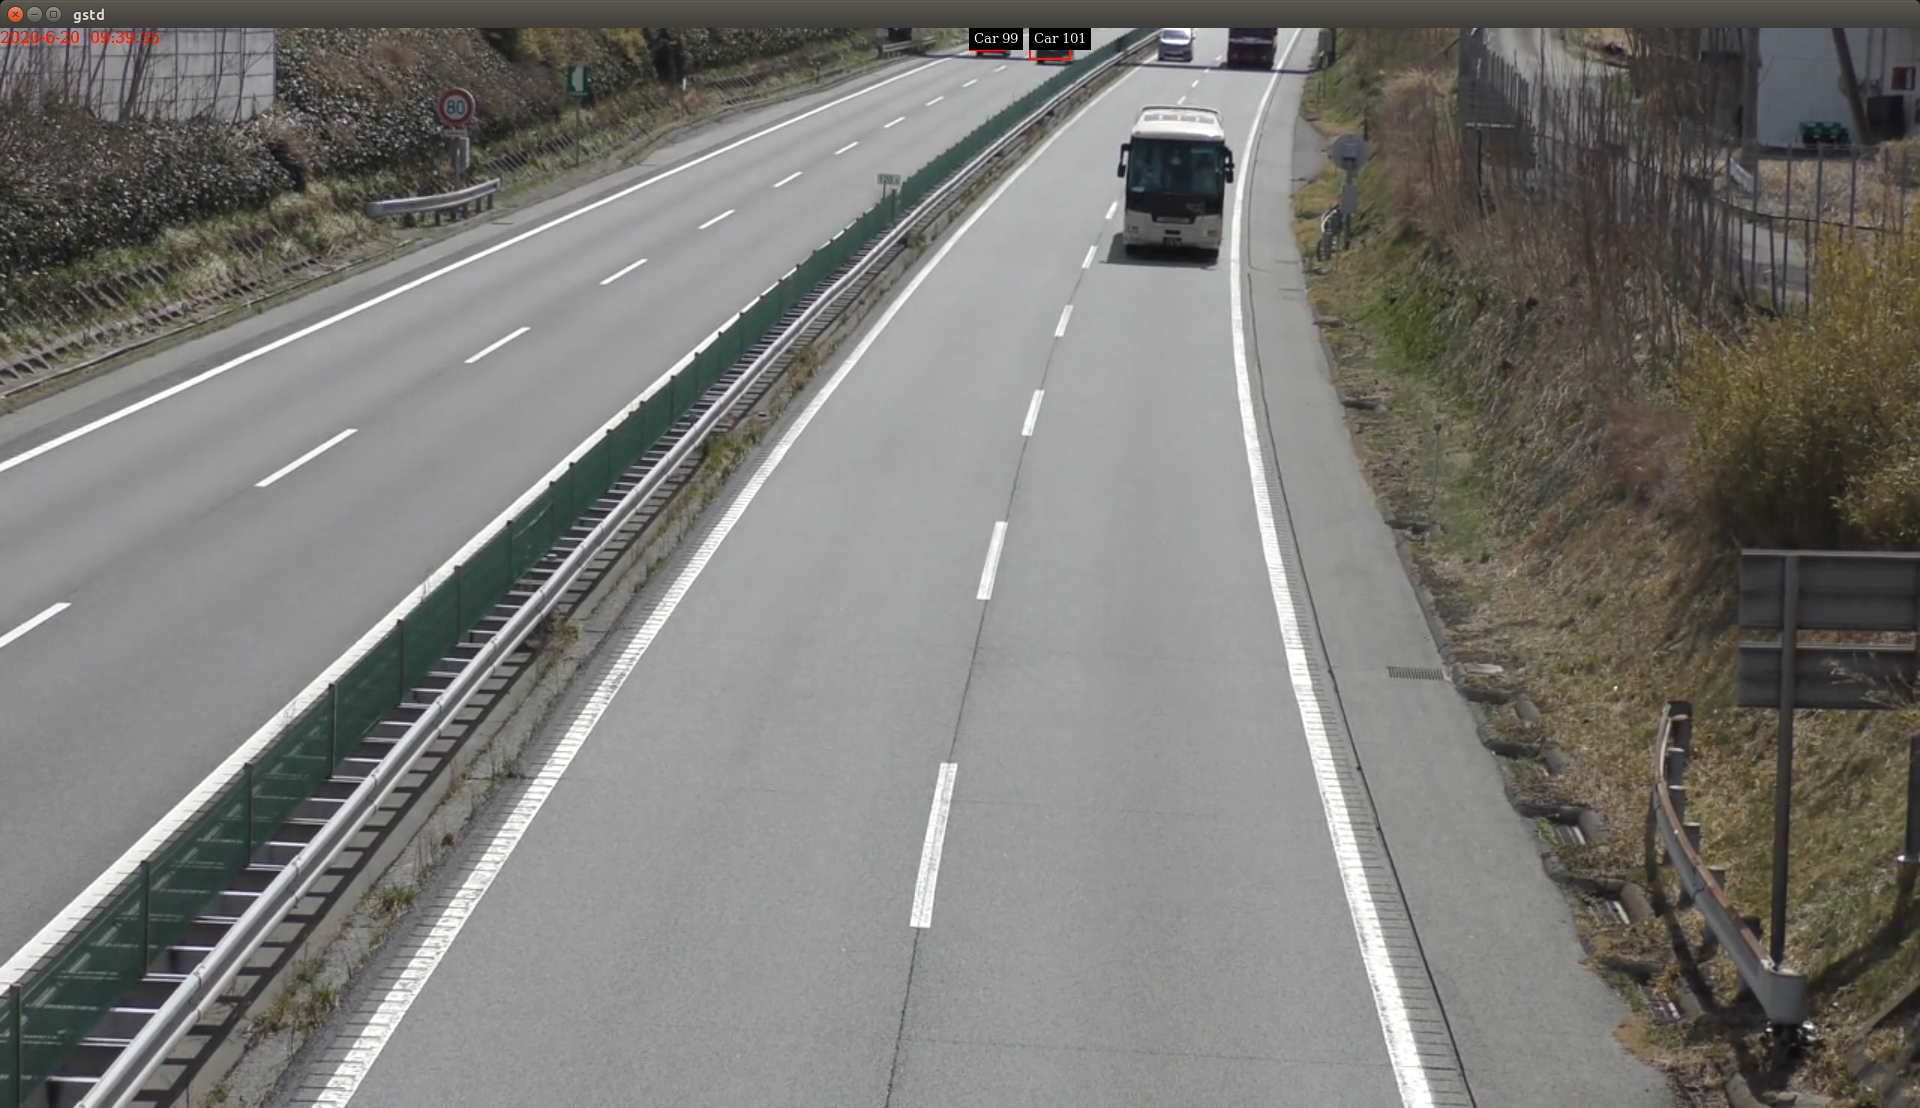
Click Play button, and wait for a few seconds, you’ll see events are getting generated and passed as actions.
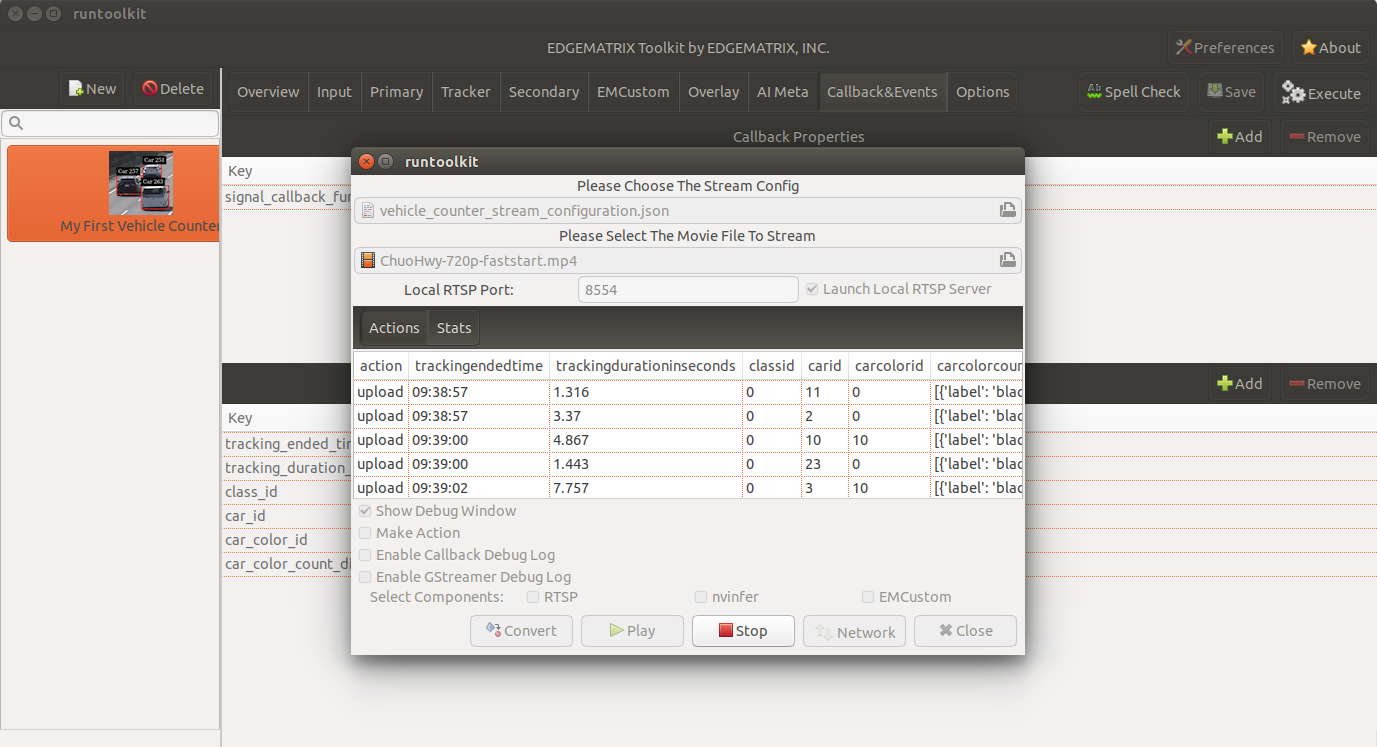
Note that Show Debug Window is checked. The debug window is shown, too.
Let’s check the EAP package built. An agent process is already up and running, so has already extracted the EAP package in the uncompressed_files folder.
$ ls -l streams/vehicle_stream/
total 26580
drwxr-xr-x 2 nvidia nvidia     4096 Sep 27 14:26 continuous-recordings
-rw-r--r-- 1 nvidia nvidia        0 Sep 27 14:26 gstd.log
drwxr-xr-x 2 nvidia nvidia     4096 Sep 27 14:26 prerecordings
-rw-r--r-- 1 nvidia nvidia   153872 Sep 27 14:26 stream.log
drwxr-xr-x 3 nvidia nvidia     4096 Sep 27 14:26 uncompressed_files
-rw-rw-r-- 1 nvidia nvidia     1785 Sep 17 17:48 vehicle_counter_stream_configuration.json
-rw-r--r-- 1 nvidia nvidia 27044685 Sep 27 14:26 vehicle_counter.zip
/mnt/nvme/toolkit_home$ ls -l streams/vehicle_stream/uncompressed_files/
total 32
-rw-r--r-- 1 nvidia nvidia  6764 Sep 27 14:26 emi_signal_callback.py
-rw-r--r-- 1 nvidia nvidia  2600 Sep 27 14:26 emi_stream_config.json
-rw-r--r-- 1 nvidia nvidia 13271 Sep 27 14:26 icon.png
drwxr-xr-x 3 nvidia nvidia  4096 Sep 27 14:26 resource
The folder structure exactly the same as the one of the application folder as you have seen.
But there are a couple of exceptions. All the trained binaries and related files are encrypted.
You can tell by a file extention. Files with .gpg are encrypted with GnuPG.
/mnt/nvme/toolkit_home$ ls -l streams/vehicle_stream/uncompressed_files/resource/models/
total 8
drwxr-xr-x 2 nvidia nvidia 4096 Sep 27 14:28 Primary_Detector
drwxr-xr-x 2 nvidia nvidia 4096 Sep 27 14:28 Secondary_CarColor
/mnt/nvme/toolkit_home$ ls -l streams/vehicle_stream/uncompressed_files/resource/models/Primary_Detector/
total 10404
-rw-r--r-- 1 nvidia nvidia    1126 Sep 27 14:28 cal_trt.bin
-rw-r--r-- 1 nvidia nvidia      28 Sep 27 14:28 labels.txt
-rw-r--r-- 1 nvidia nvidia 4384440 Sep 27 14:28 resnet10.caffemodel_b1_gpu0_int8.engine.gpg
-rw-r--r-- 1 nvidia nvidia 6246460 Sep 27 14:28 resnet10.caffemodel.gpg
-rw-r--r-- 1 nvidia nvidia    7679 Sep 27 14:28 resnet10.prototxt.gpg
/mnt/nvme/toolkit_home$ ls -l streams/vehicle_stream/uncompressed_files/resource/models/Secondary_CarColor/
total 14828
-rw-r--r-- 1 nvidia nvidia    2078 Sep 27 14:28 cal_trt.bin
-rw-r--r-- 1 nvidia nvidia      71 Sep 27 14:28 labels.txt
-rw-r--r-- 1 nvidia nvidia  150543 Sep 27 14:28 mean.ppm
-rw-r--r-- 1 nvidia nvidia 5980814 Sep 27 14:28 resnet18.caffemodel_b16_gpu0_int8.engine.gpg
-rw-r--r-- 1 nvidia nvidia 9019921 Sep 27 14:28 resnet18.caffemodel.gpg
-rw-r--r-- 1 nvidia nvidia   14134 Sep 27 14:28 resnet18.prototxt.gpg
This shows that no decrypted files on a disk. They are decrypted and processed in memory. So even if an AI Box is stolen, your precious trained model binaries won’t be exploited immediately.

Movie files made by record actions
At last, let’s check movie files left, which were made by record actions.
Go to /mnt/nvme/toolkit_home/streams/vehicle_stream/recordings folder, then you’ll see some files as follows.
/mnt/nvme/toolkit_home$ ls -l streams/vehicle_stream/prerecordings/
total 46612
-rw-r--r-- 1 nvidia nvidia 2402998 Sep 27 14:26 vehicle_stream_prerecord_0_2021-09-27T14:26:45+0900.mp4
-rw-r--r-- 1 nvidia nvidia 5993770 Sep 27 14:27 vehicle_stream_prerecord_0_2021-09-27T14:26:51+0900.mp4
-rw-r--r-- 1 nvidia nvidia 3432174 Sep 27 14:27 vehicle_stream_prerecord_0_2021-09-27T14:27:05+0900.mp4
-rw-r--r-- 1 nvidia nvidia 3964846 Sep 27 14:27 vehicle_stream_prerecord_0_2021-09-27T14:27:12+0900.mp4
-rw-r--r-- 1 nvidia nvidia 2601630 Sep 27 14:27 vehicle_stream_prerecord_0_2021-09-27T14:27:20+0900.mp4
-rw-r--r-- 1 nvidia nvidia 3688180 Sep 27 14:27 vehicle_stream_prerecord_0_2021-09-27T14:27:26+0900.mp4
-rw-r--r-- 1 nvidia nvidia 2946481 Sep 27 14:27 vehicle_stream_prerecord_0_2021-09-27T14:27:34+0900.mp4
-rw-r--r-- 1 nvidia nvidia 5287152 Sep 27 14:27 vehicle_stream_prerecord_0_2021-09-27T14:27:39+0900.mp4