Tutorials
- Preparing a simple Detector project
- Using your own events and callback function
- Write your own callback function
- Use your own event
- Test your application
- Using your own input source
- Preparing your movie file for a streaming
- Use your own stream ready movie file
- Using your own trained model binary
- Place your trained model binary and related files
- Change property configurations
- Using your own trained Yolo model binary with IPlugin
- Follow the Yolo tutorial on DeepStream SDK
- Place your trained Yolo model binary and related files
- Change property configurations
- Using your own trained SSD model binary with IPlugin
- Follow the SSD tutorial on DeepStream SDK
- Place your trained SSD model binary and related files
- Change property configurations
Preparing a simple Detector project
In this tutorials, a simple vehicle detector will be customized. So, please create one as follows.
At first, create a simple vehicle detector from a vehicle template.
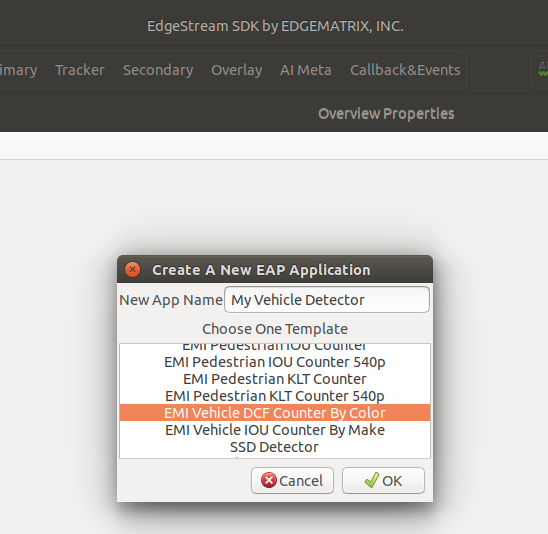
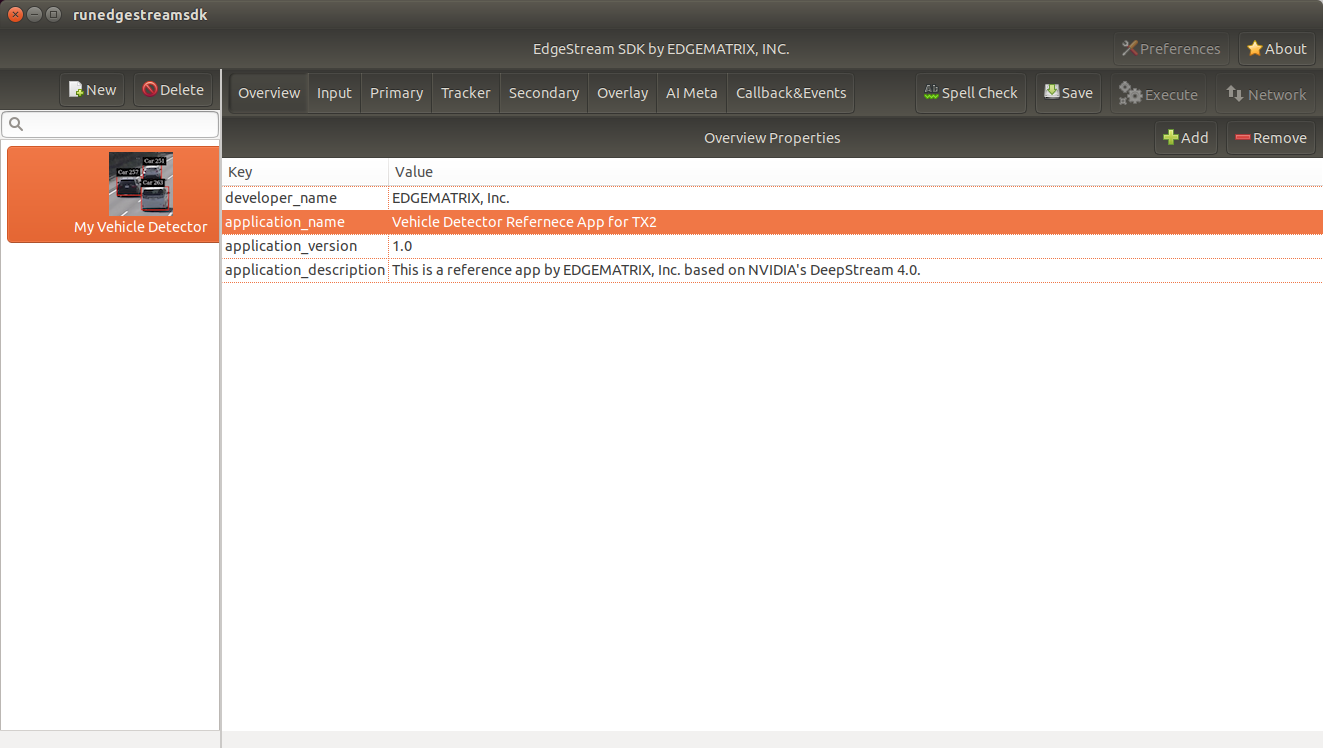
Then, modify the application name to reflect this application.
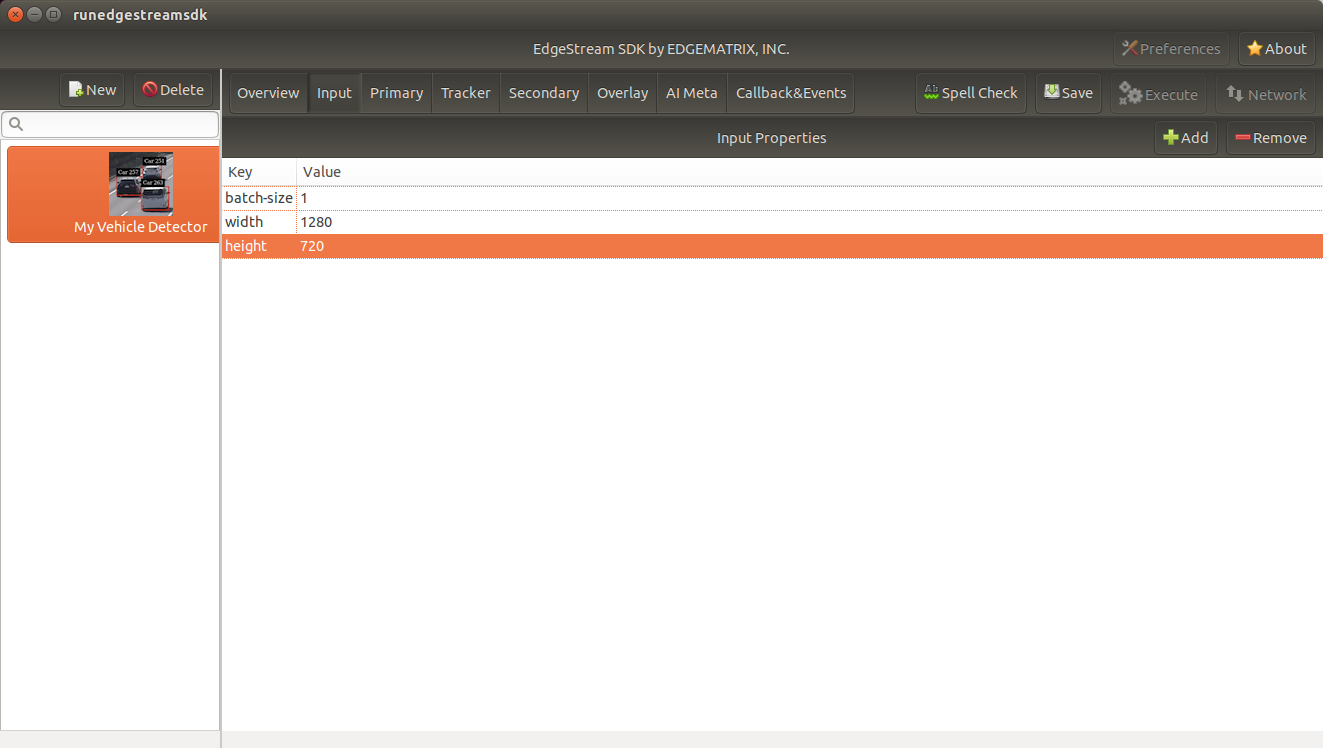
And change the resolution for the primary inference.
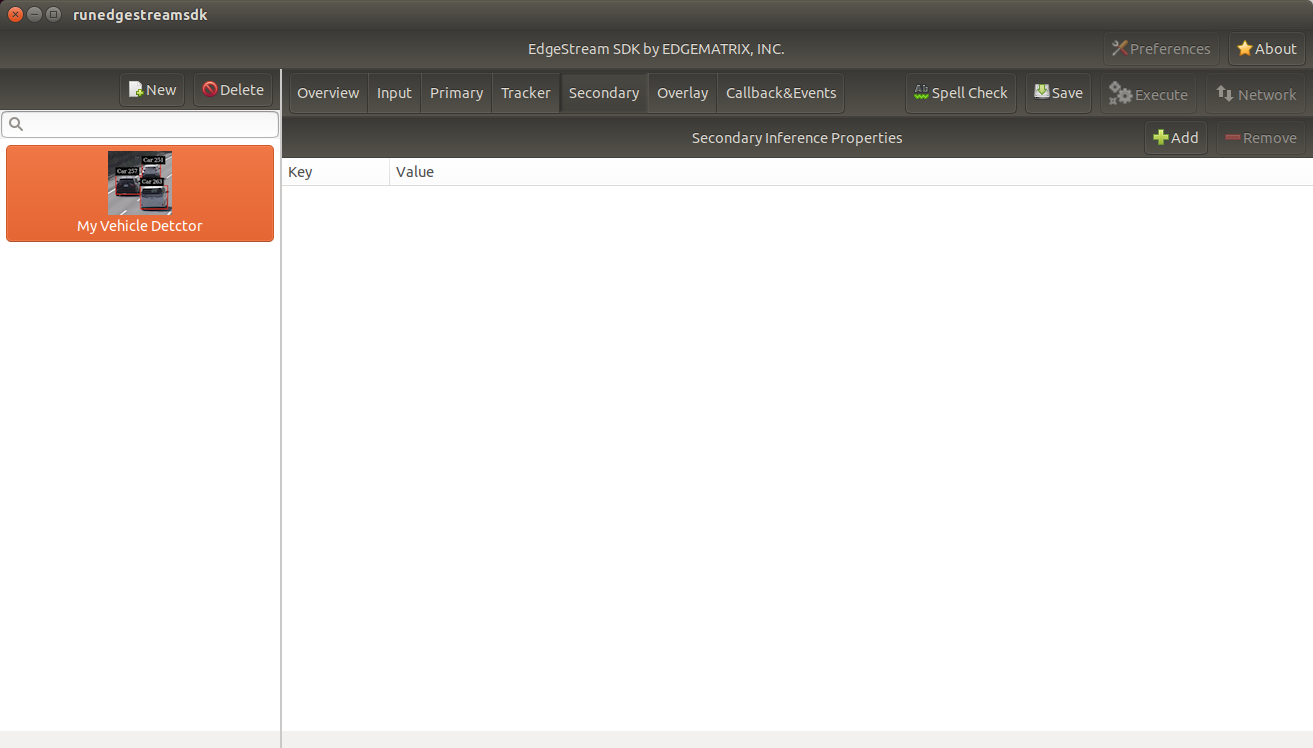
The template has a tracker and a secondary model inference as well as a primary inference. So, let’s remove all the properties related to a tracker and a secondary inference by selecting each property followed by “Remove”.
Then, modify event items for a detector as follows.
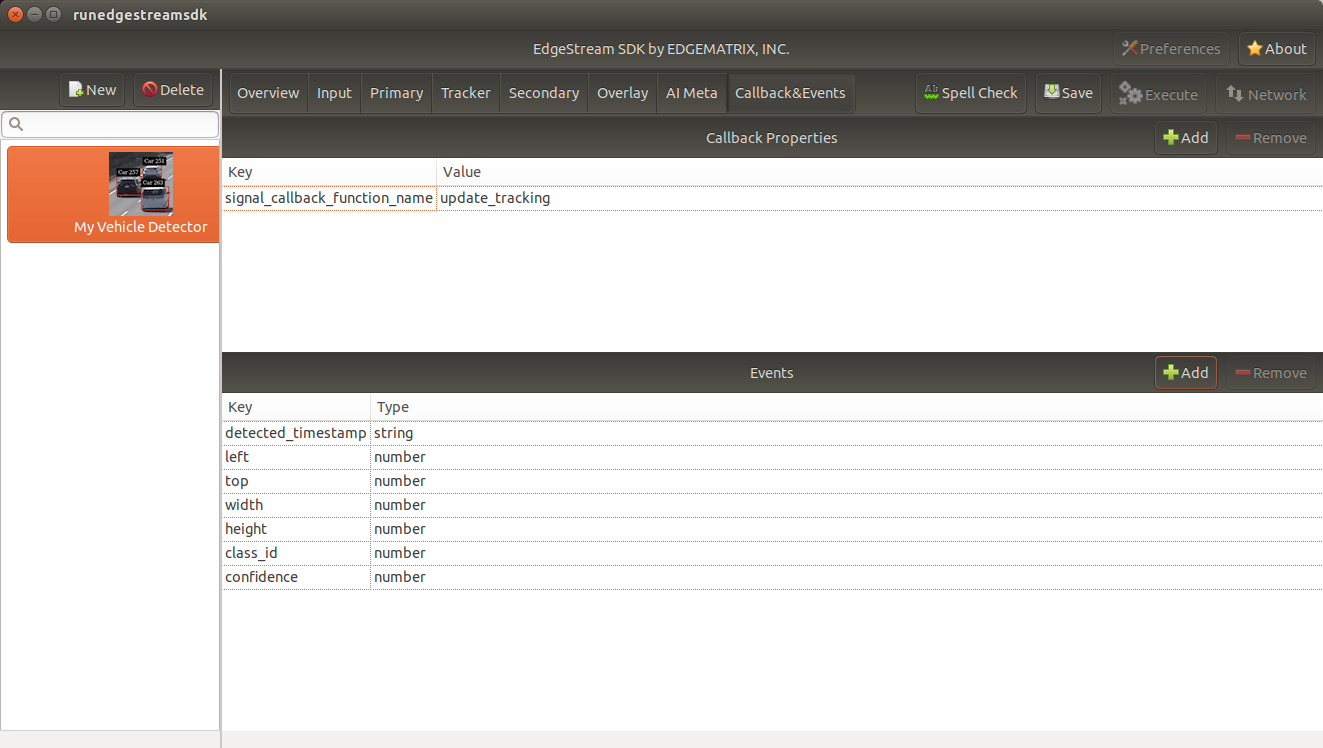
Please note that now this application raises events about a location of a detected object, instead of properties of each identified object by a tracker.
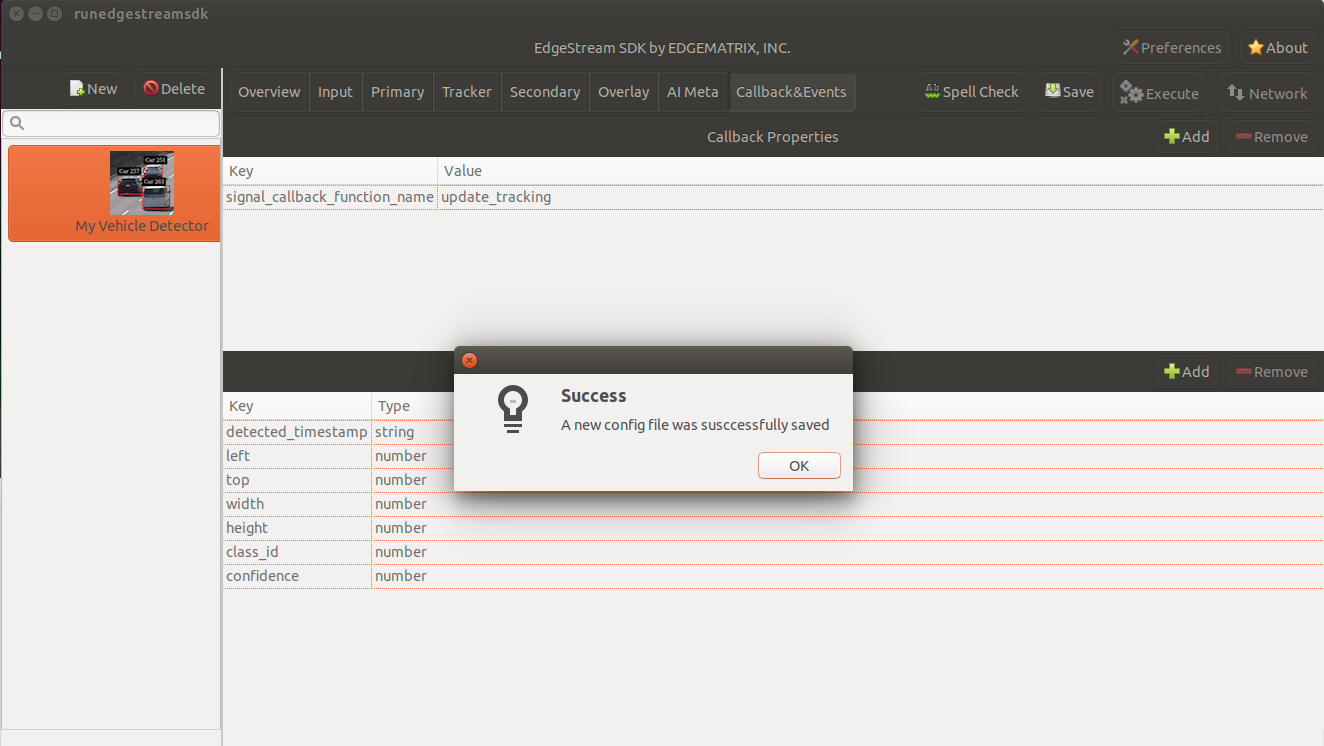
Now, it’s time to save these changes. Click “Save” button, then the sdk will reload applications.
Using your own events and callback function
In the last section, event items are modified for the detector.
So, you need to update the callback function as well.
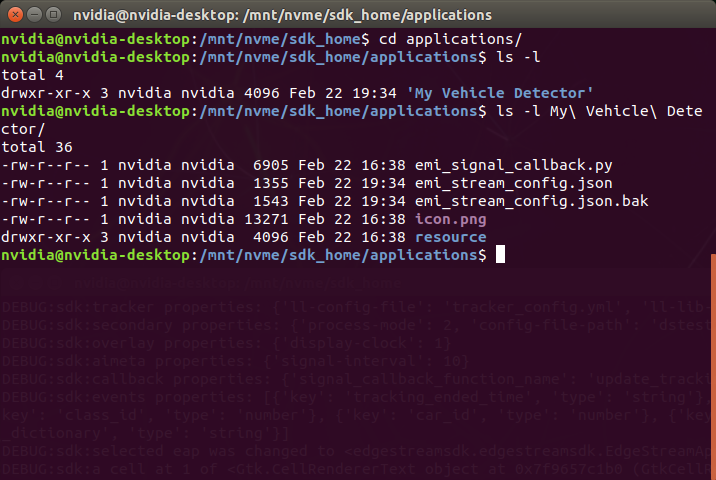
The python file that defines a callback function exists as “emi_signal_callback.py” in an application folder as follows.
Write your own callback function
Copy the following content to the “emi_signal_callback.py”.
from datetime import datetime

ISO_FORMAT = '%Y-%m-%dT%H:%M:%S.%f%z'

'''
Vehicle Detector

Keys:
    detected_datetime (string): The datetime when this object was detected
    left (number): The left coordinate of this object
    top (number): The top coordinate of this object
    width (number): The width of this object
    height (number): The height of this object
'''

class Car:

    def __init__(self, detected_timestamp, left, top, width, height, class_id, confidence):
        self.detected_timestamp = detected_timestamp
        self.left = left
        self.top = top
        self.width = width
        self.height = height
        self.class_id = class_id
        self.confidence = confidence

    def to_event_item(self):
        event_item = {
            'detected_timestamp': self.detected_timestamp,
            'left': self.left,
            'top': self.top,
            'width': self.width,
            'height': self.height,
            'class_id': self.class_id,
            'confidence': self.confidence
        }
        return event_item

    def iso_timestamp_to_datetime(timestamp):
        return datetime.strptime(timestamp, ISO_FORMAT)

def update_tracking(signal):
    """ a signal callback function """
    debug_string = ''
    detected_cars = []
    frame_list = signal["frame"]
    for frame in frame_list:
        timestamp = frame['timestamp']
        objects = frame["object"]
        debug_string = debug_string + 'signal@' + timestamp + ':' + str(len(objects)) + 'objects\n'
        for obj in objects:
            class_id = obj['class_id']
            confidence = obj['confidence']
            rect_params = obj['rect_params']
            left = rect_params['left']
            top = rect_params['top']
            width = rect_params['width']
            height = rect_params['height']
            car = Car(timestamp, left, top, width, height, class_id, confidence)
            detected_cars.append(car.to_event_item())

    return detected_cars, debug_string
The callback function name was left as “update_tracking”, but the whole content was replaced.
Let’s go back to the SDK, and check if this callback works correctly by pressing “Spell Check”.
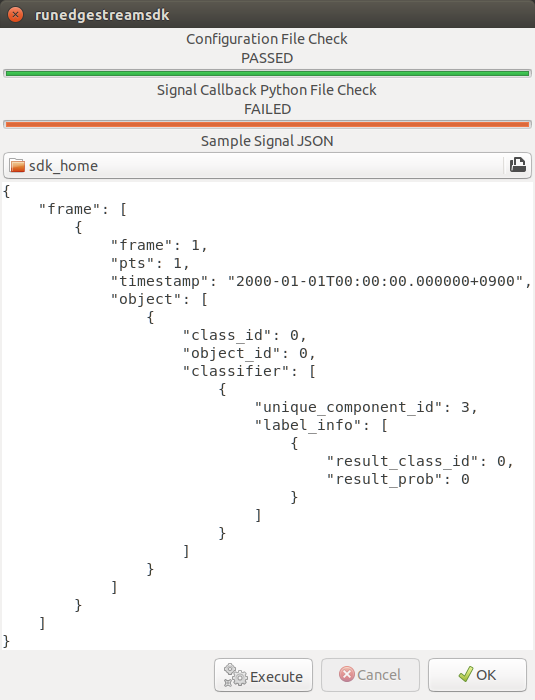
Oops, failed. If you look at your console, you’ll see an output like this.
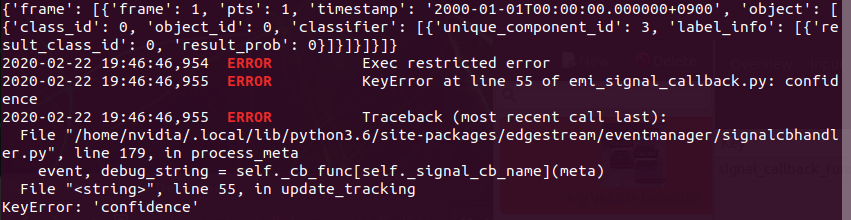
It says “confidence” does not exist in the produced event, which is based on a template. So, let’s create our own event and use it for this check.
Use your own event
Copy the following content to “detector_signal.json” in the signals folder under the SDK root folder. If you happen to place such a file in an application folder, it wouldn’t work correctly.
{
    "frame": [
        {
            "frame": 1,
            "pts": 1,
            "timestamp": "2000-01-01T00:00:00.000000+0900",
            "object": [
                {
                    "class_id": 0,
                    "confidence": 0.0,
                    "rect_params": {
                        "left": 0,
                        "top": 0,
                        "width": 0,
                        "height": 0
                    }
                }
            ]
        }
    ]
}
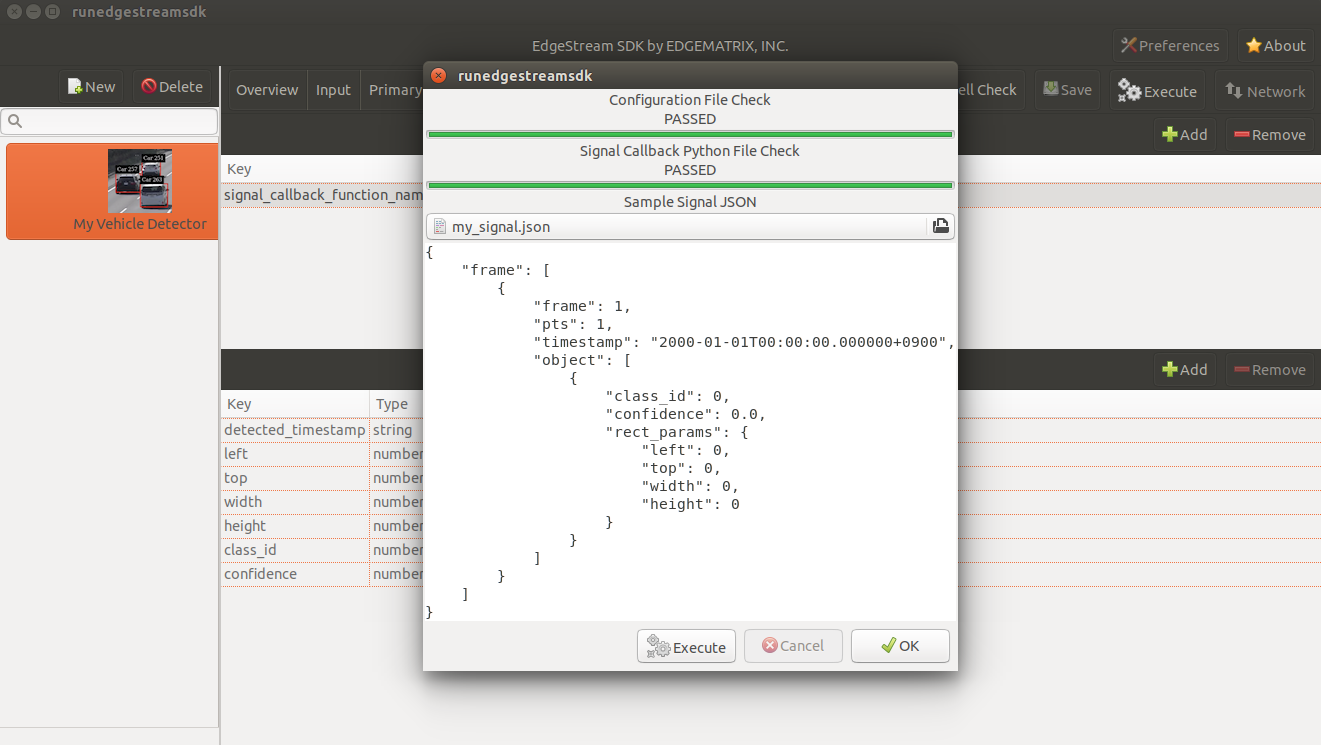
Note that another missing key, “rect_params”, was also added.
Then, try again “Spell Check”. This time, make sure to choose “detector_signal.json”. By pressing “Execute”, you’ll see your application pass the check.
Test your application
So, finally, let’s test your application.
But, you need to create a stream folder to run this application.
Copy an existing “vehicle_stream” folder and name it “mydetector_stream”.
Now the folder structure should look like this.
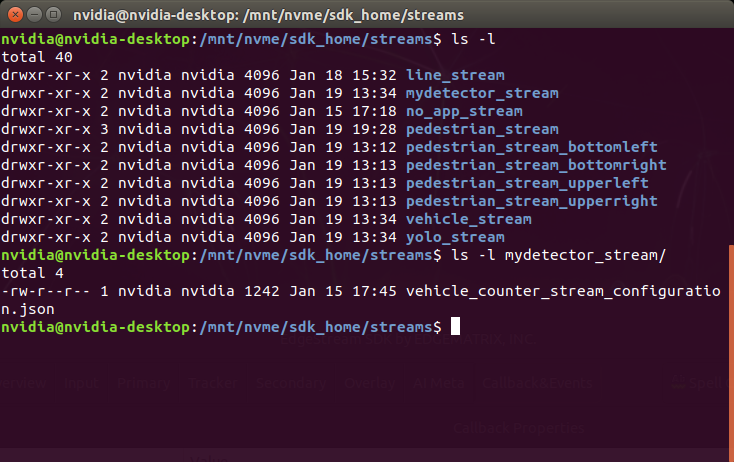
If you find any other files or folders when you come from the quickstart, then remove all the files except for “vehicle_by_make_counter_stream_configuration.json”.
Rename “vehicle_by_make_counter_stream_configuration.json” as “mydetector_stream_configuration.json”, then copy the following content.
{
  "stream_id": "mydetector_stream",
  "created": "2019-07-23T09:10:29.842496+09:00",
  "last_updated": "2019-07-24T10:11:30.842496+09:00",
  "revision": 3,
  "stream_type": "rtsp",
  "location": "rtsp://127.0.0.1:8554/test",
  "mode": "sender",
  "roi": {
    "left": 0,
    "right": 0,
    "top": 0,
    "bottom": 0
  },
  "action_rules": [
    {
      "rule_name": "Vehicle Recording",
      "and": [
        {
          "key": "width",
          "operator": ">",
          "value": 100
        },
        {
          "key": "height",
          "operator": ">",
          "value": 100
        }
      ],
      "or": [],
      "action": {
        "action_name": "record",
        "duration_in_seconds": 3
      }
    },
    {
      "rule_name": "Upload to AWS Kinesis Firehose",
      "and": [
        {
          "key": "width",
          "operator": ">",
          "value": 100
        },
        {
          "key": "height",
          "operator": ">",
          "value": 100
        }
      ],
      "or": [],
      "action": {
        "action_name": "upload",
        "deliveryStreamName": "trafficStream",
        "accessKey": "",
        "secretKey": "",
        "region": ""
      }
    }
  ],
  "application_package": {
    "filename": "mydetector.zip",
    "license": "ABC01234"
  }
}
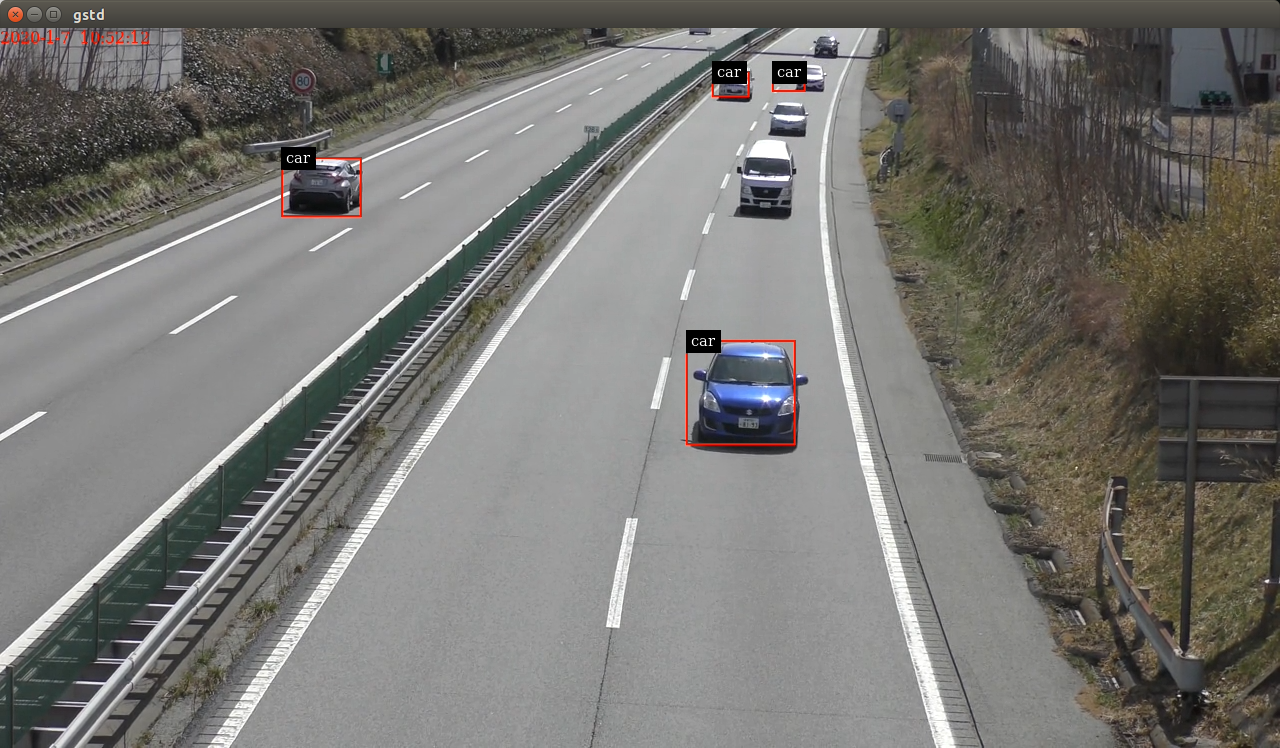
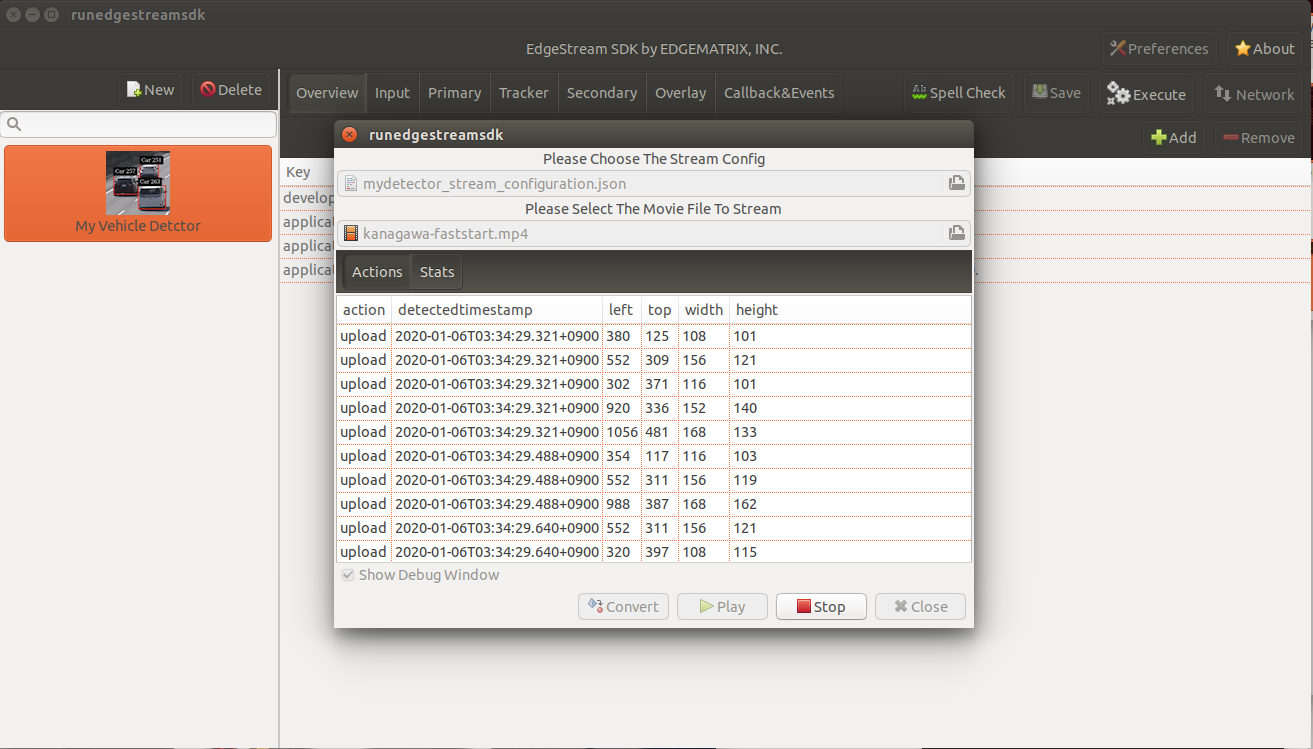
By executing this application in the “mydetector_stream” folder with the sample video file, it will be shown as follows, which correctly produces upload actions for each event with both of an width and an height are larger than 100.
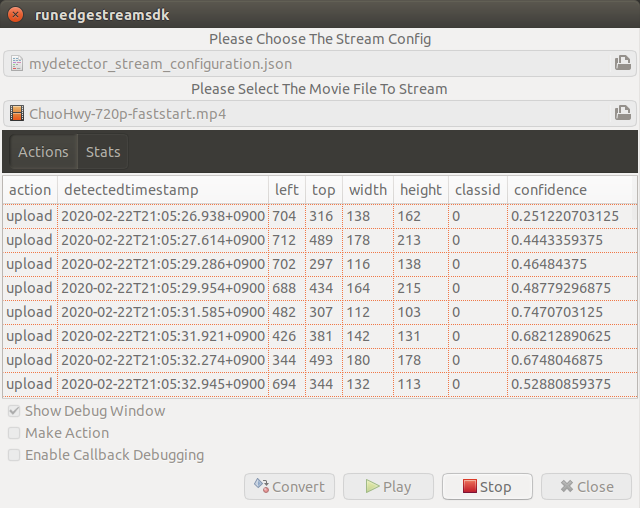
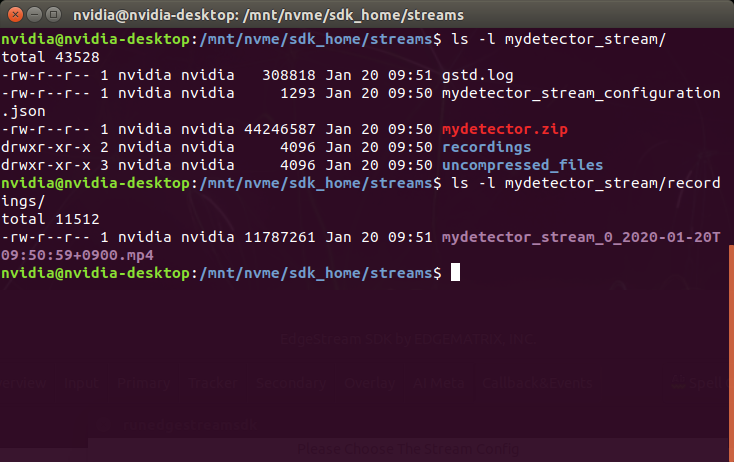
Also, recording actions will be invoked, and leave some movie files in the recordings folder.
Using your own input source
Using your own movie file is no more than choosing your own file when executing your application.
But making a movie file needs to follow some rules.
Preparing your movie file for a streaming
A movie file chosen at an execution is used internally as a source of local RTSP server.
Such a movie file contianer needs to be mp4. Other container may work, but not tested well.
The local RTSP stream is hard coded as an H.264 stream. So an encoding of video in your movie file should be H.264.
And there is an issue having some troubles if the bitrate becomes high. So it is recommended to prepare one as 720p (1280x720) at up to 30 fps.
Also, a movie file has to be ready for streaming, which means all the necessary information is placed at the beginning of a file.
This can be checked by qtfaststart. For example, the sample movie file looks as below.
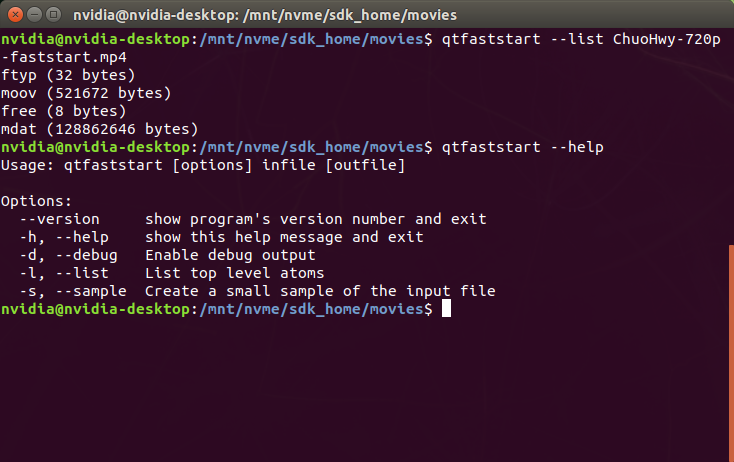
With qtfaststart, you can also convert a non-faststart movie file to a faststart one by executing as follows.
$ qtfaststart NON_FASTSTART_FILE FASTSTART_FILE
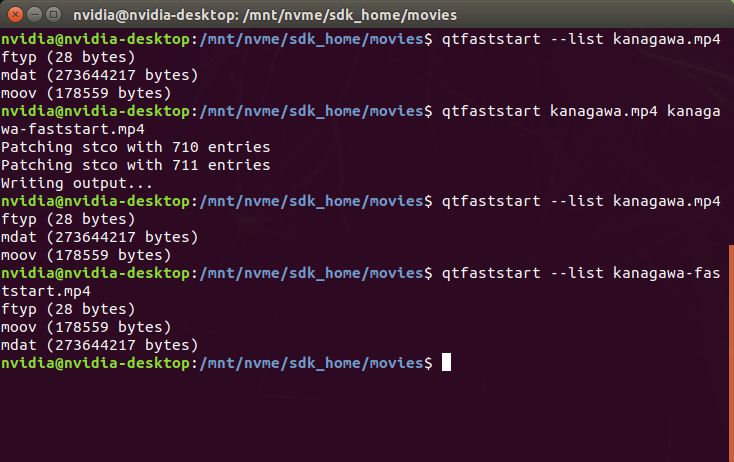
Use your own stream ready movie file
Here’s an example of a non-faststart file.
Actions)
Debug Window)

Using your own trained Yolo model binary with IPlugin
If you have your own trained Yolo model, you can refer to the following guide by NVIDIA.
Custom YOLO Model in the DeepStream YOLO App
Here in this tutorial, you will see how to package a sample Yolo detector contained in DeepStream 4.0.1.
Follow the Yolo tutorial on DeepStream SDK
At first, download the deepstream pcakage from here.
After extracting the pakcage, go to the project directory, follow the README file to build custom libraries as follows.
$ cd sources/objectDetector_Yolo/
$ ./prebuild.sh
$ export CUDA_VER=10.0
$ make -C nvdsinfer_custom_impl_Yolo
Then, launch the deepstream-app to check if it correctly works. Also, at this initial launch, a TensorRT engine file is created.
$ deepstream-app -c deepstream_app_config_yoloV3_tiny.txt
Note that the Tiny Yolo V3 application runs as fast as about 50 fps in FP32 mode on Jetson TX2. You can try different Yolo versions to see their performances.
The configuration of the tiny Yolo V3 will be used here in the following sections.
Place your trained Yolo model binary and related files
Now that you have a working example of your Yolo model binary and related files, let’s package them as an EAP file.
Copy the simple Detector project folder in applications folder, then rename as “My Yolo Detector”.
Then, remove all the text files and the so file under resource folder. Also, drop the Secondary_CarColor folder and all the files in the Primary_Detector folder under the resource/models folder.
Old files got cleanup. So, let’s put new files.
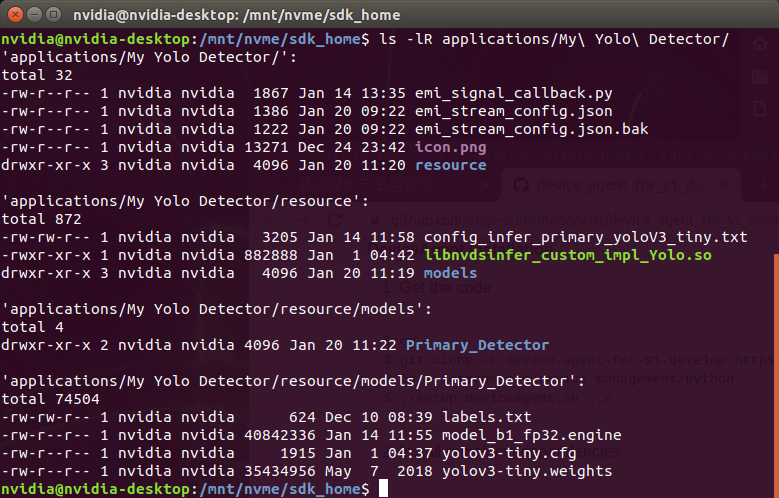
Copy config_infer_primary_yoloV3_tiny.txt and nvdsinfer_custom_impl_Yolo/libnvdsinfer_custom_impl_Yolo.so to the resource folder. Then, copy the following files to the resource/models/Primary_Detector folder.
- labels.txt
- model_b1_fp32.engine
- yolov3_tiny.cfg
- yolov3_tiny.weights
The folder structure now looks like this:
Close if you still open the SDK, then open to load the new application.
Change property configurations
The only property you have to change is config-file-path in the Primary.
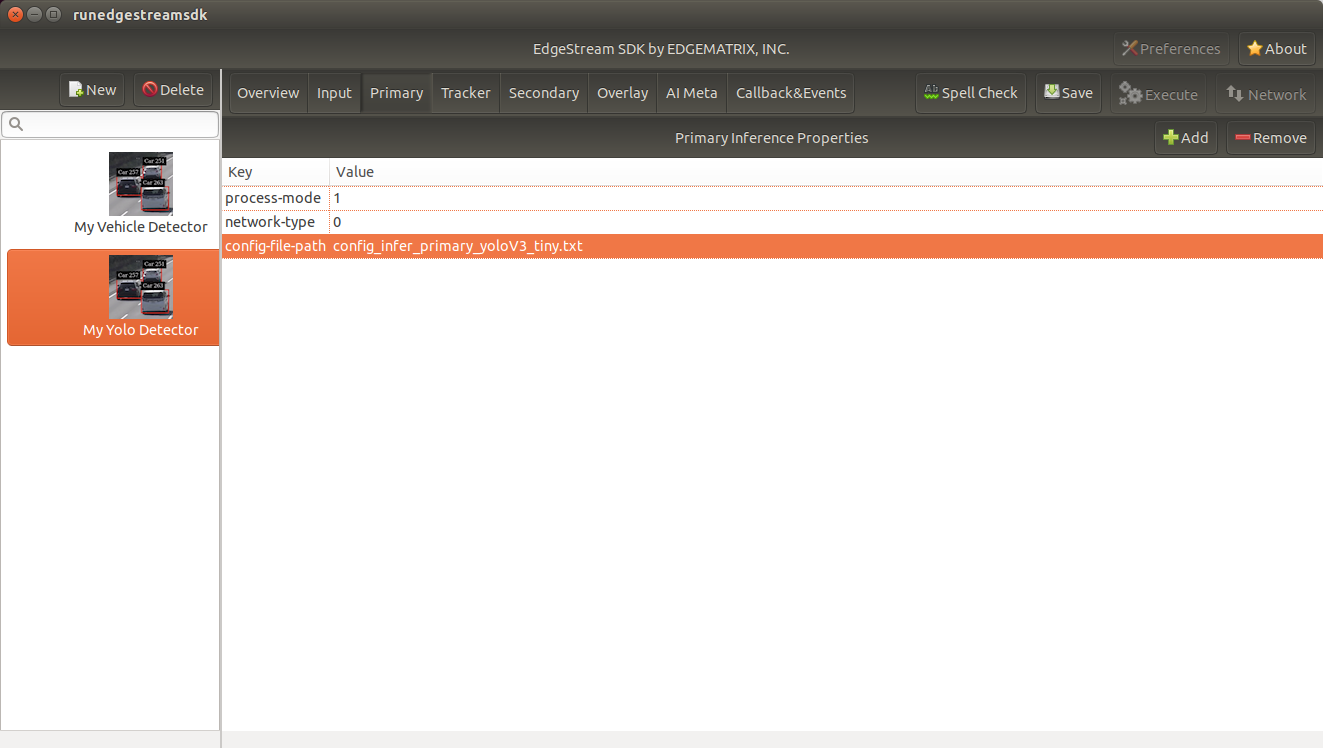
After changing the property, save the config. Then, open config_infer_primary_yoloV3_tiny.txt, and update properties as follows. Please make sure to comment out the model-engine-file property, and add “.gpg” suffixes.
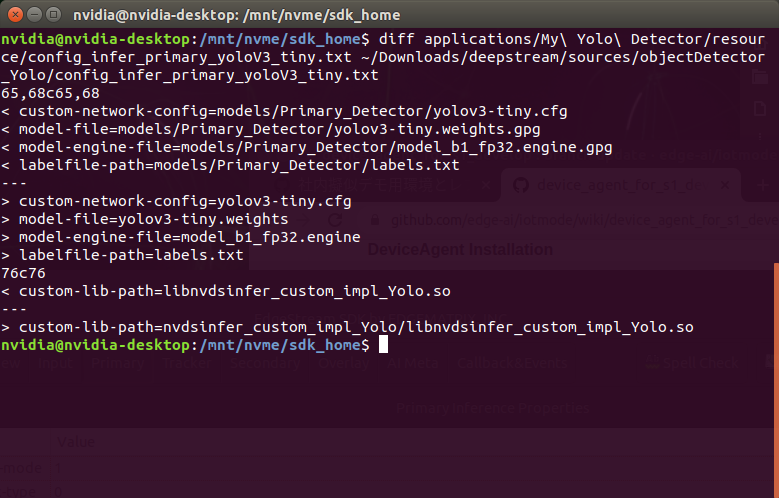
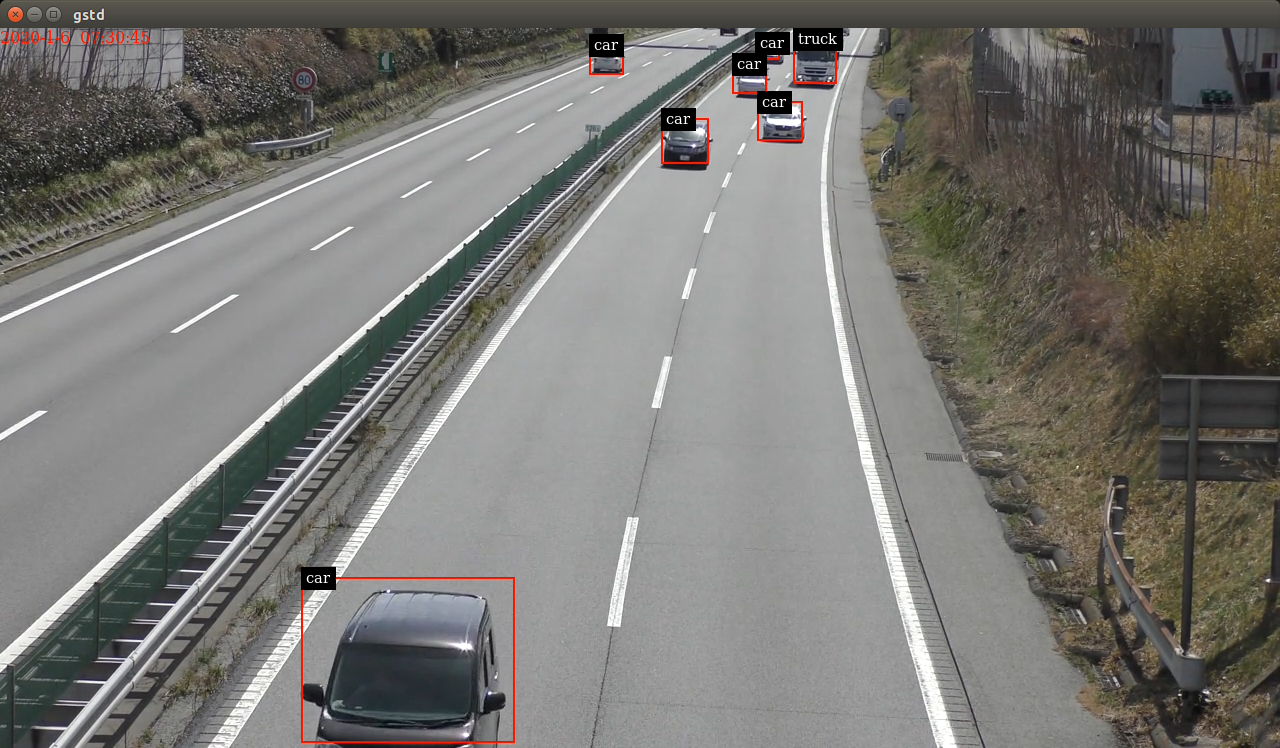
By following the procedures as before, your application can be launched in the mydetector_stream as below.
Actions)
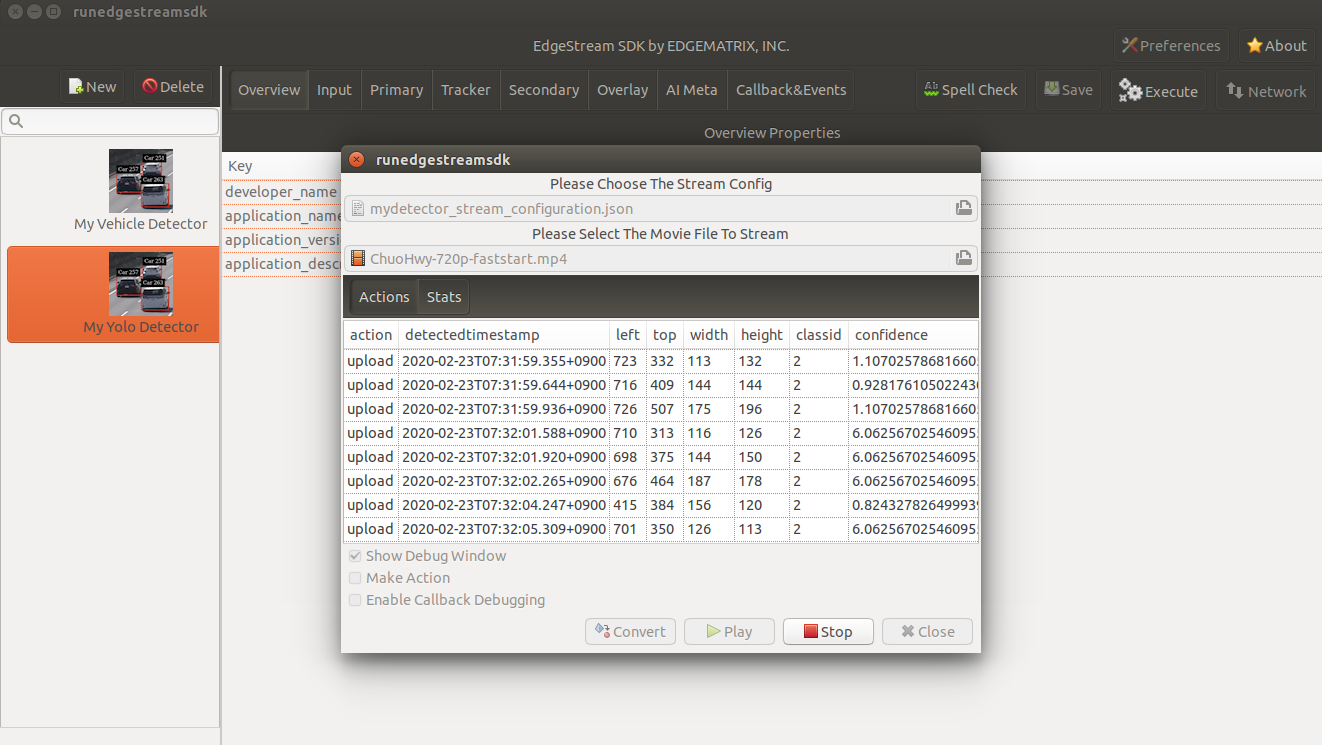
Debug Window)
Using your own trained SSD model binary with IPlugin
This is pretty much the same as the previous Yolo example.
Follow the SSD tutorial on DeepStream SDK
If you did not download the deepstream package, yet, download it from here.
After extracting the pakcage, go to the project directory, follow the README file to build custom libraries as follows.
$ cd sources/objectDetector_SSD/
$ cp /usr/src/tensorrt/data/ssd/ssd_coco_labels.txt ./
$ apt search uff-converter
$ pip3 show tensorflow-gpu
$ wget http://download.tensorflow.org/models/object_detection/ssd_inception_v2_coco_2017_11_17.tar.gz
$ tar xzvf ssd_inception_v2_coco_2017_11_17.tar.gz
$ cd ssd_inception_v2_coco_2017_11_17/
$ python3 /usr/lib/python3.6/dist-packages/uff/bin/convert_to_uff.py \
         frozen_inference_graph.pb -O NMS \
         -p /usr/src/tensorrt/samples/sampleUffSSD/config.py \
         -o sample_ssd_relu6.uff
$ cd ..
$ cp ssd_inception_v2_coco_2017_11_17/sample_ssd_relu6.uff ./
$ export CUDA_VER=10.0
$ make -C nvdsinfer_custom_impl_ssd
Then, launch the deepstream-app to check if it correctly works. Also, at this initial launch, a TensorRT engine file is created.
$ deepstream-app -c deepstream_app_config_ssd.txt
Note that the SSD application runs as fast as about 21 fps in FP32 mode on Jetson TX2.
Place your trained SSD model binary and related files
Now that you have a working example of your SSDK model binary and related files, let’s package them as an EAP file.
Copy the simple Detector project folder in applications folder, then rename as “My SSD Detector”.
Then, remove all the text files and the so file under resource folder. Also, drop the Secondary_CarColor folder and all the files in the Primary_Detector folder under the resource/models folder.
Old files got cleanup. So, let’s put new files.
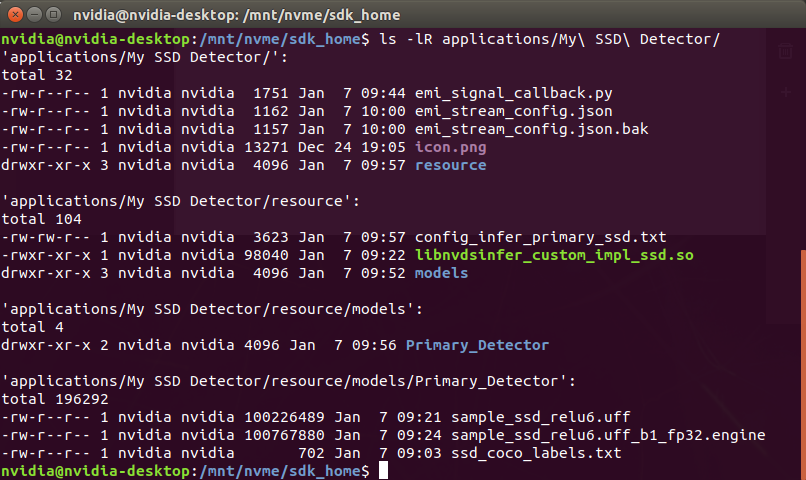
Copy config_infer_primary_ssd.txt and nvdsinfer_custom_impl_ssd/libnvdsinfer_custom_impl_ssd.so to the resource folder. Then, copy the following files to the resource/models/Primary_Detector folder.
- sample_ssd_relu6.uff
- sample_ssd_relu6.uff_b1_fp32.engine
- ssd_coco_labels.txt
The folder structure now looks like this:
Close if you still open the SDK, then open to load the new application.
Change property configurations
The only property you have to change is config-file-path in the Primary.
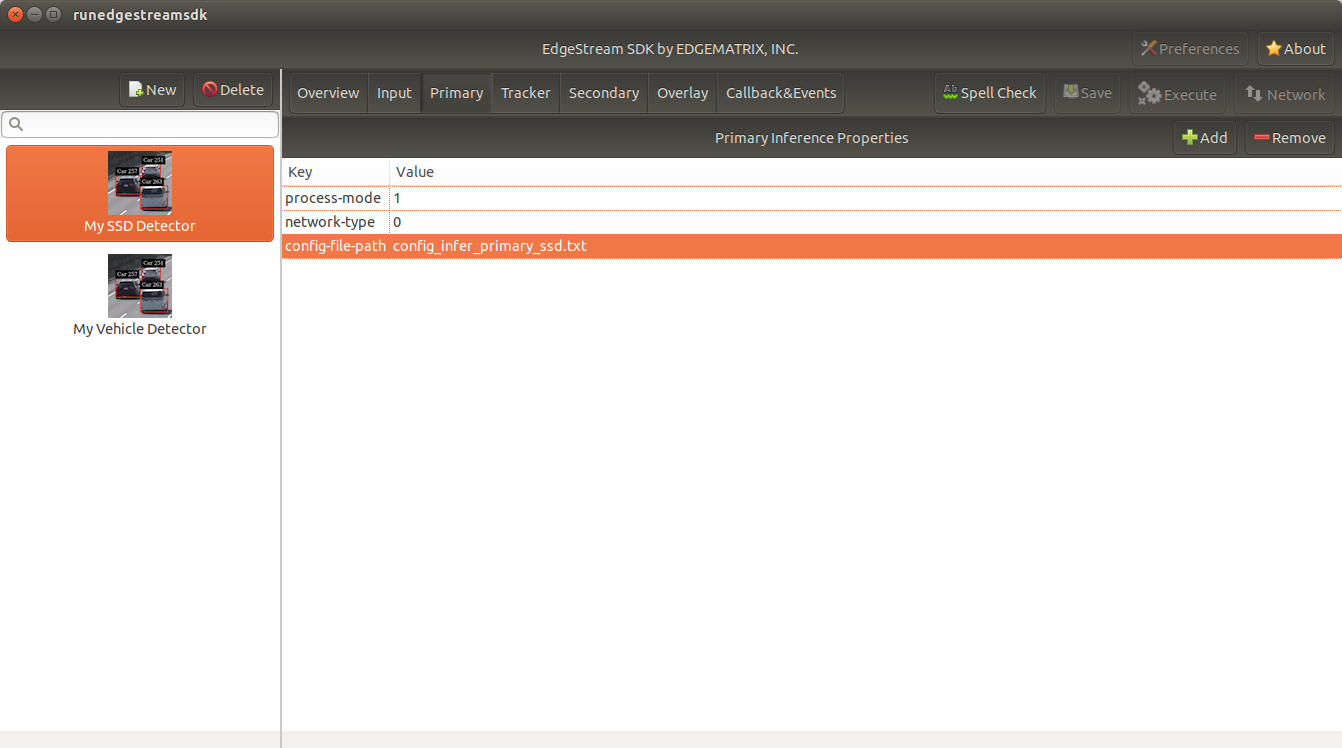
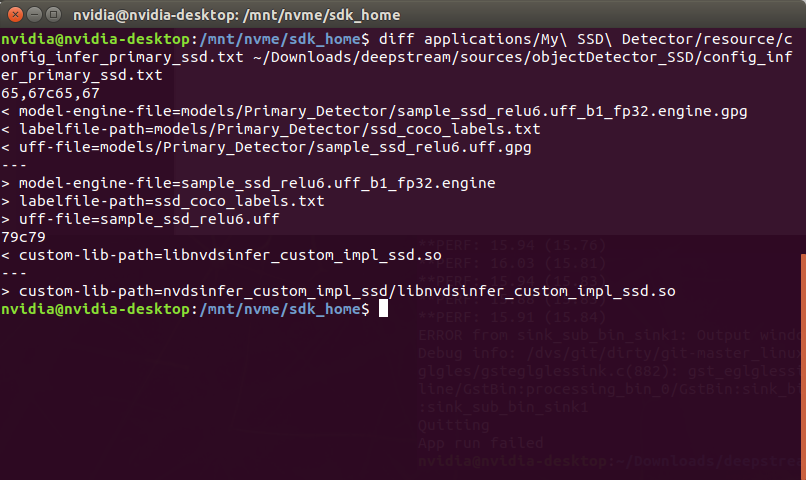
After changing the property, save the config. Then, open config_infer_primary_ssd.txt, and update properties as follows. Please make sure to add “.gpg” suffixes.
By following the procedures as before, your application can be launched in the mydetector_stream as below.
Actions)
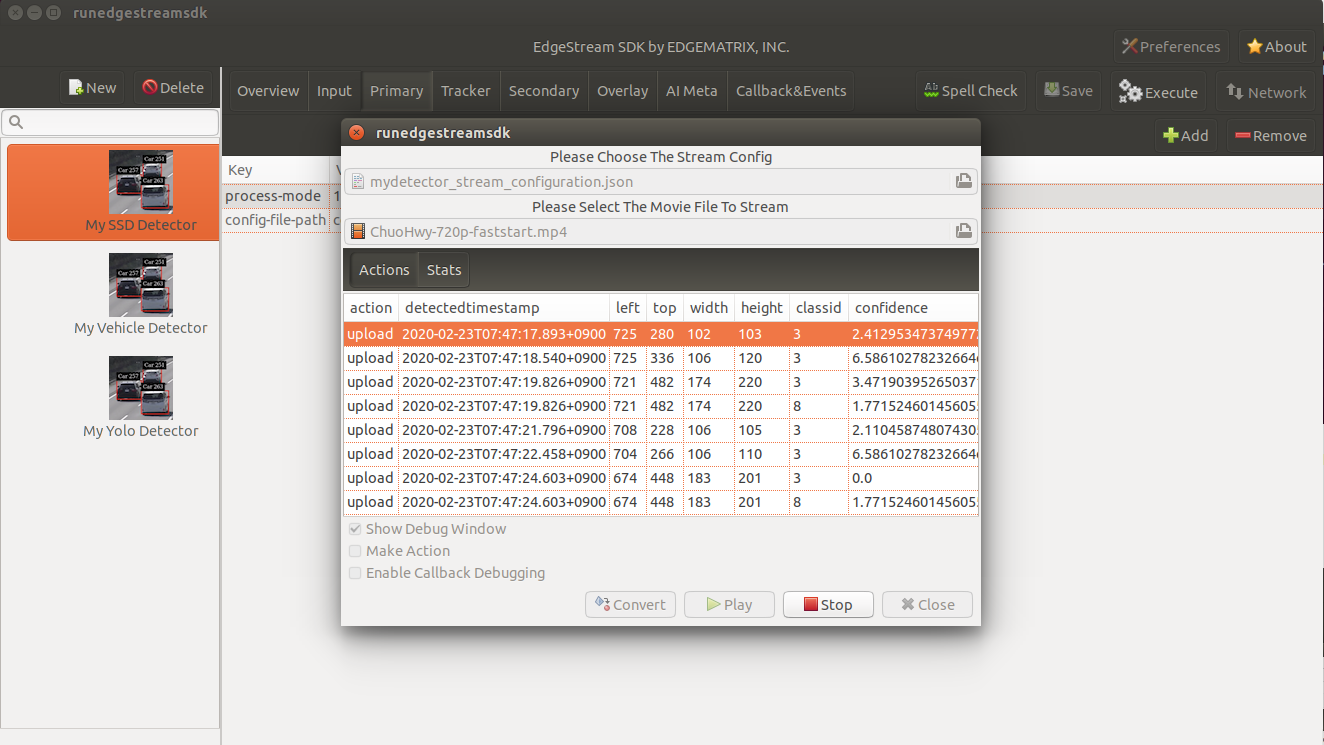
Debug Window)